Sabrina Ramonov ๐Ÿ„ ยท Youtube ยท 27:47

Claude + Canva Just Changed Content Creation Forever

A 27-minute step-by-step walkthrough of the Claude + Canva connector: four design use cases, Blotato-powered social publishing, and Brand Kit integration.

Posted
May 24th 2026
4 days ago
Duration
27:47
Format
Tutorial
educational
Channel
SR
Sabrina Ramonov ๐Ÿ„
ยง 01 ยท The Hook

The bait, then the rug-pull.

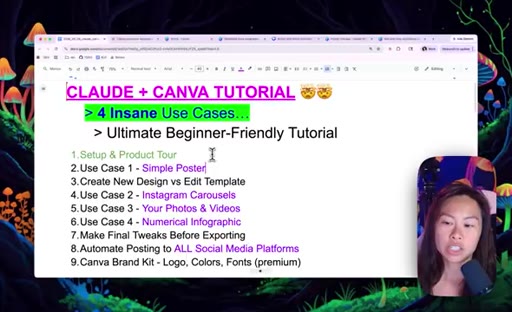
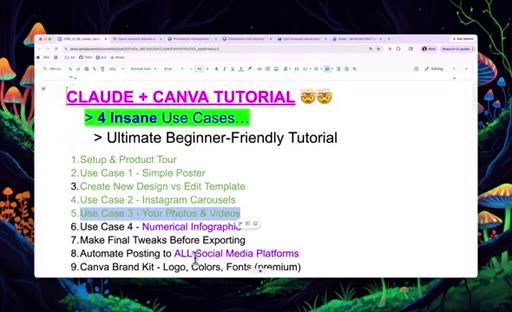
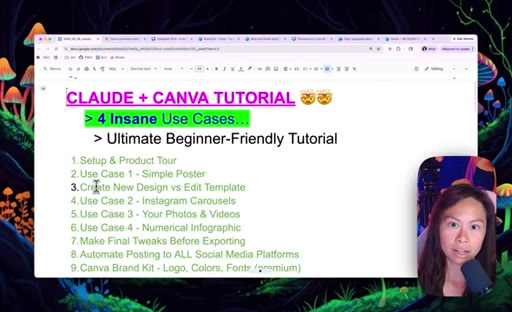
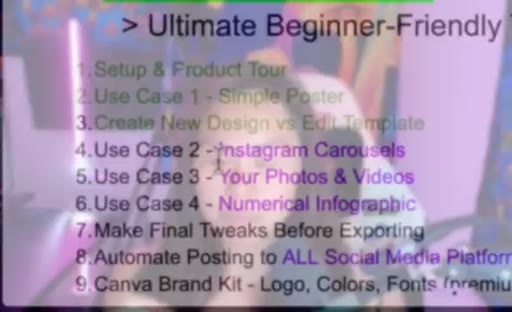
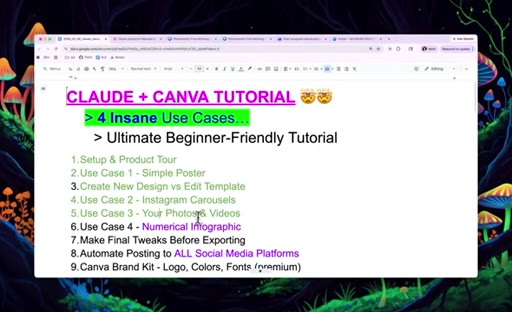
The pitch is blunt: one connector, four use cases, fifteen hours back in your week. The tutorial opens with a full chapter map on screen so viewers can jump directly to what they need, a structural choice that doubles as a retention signal.

ยง ยท Chapters

Where the time goes.
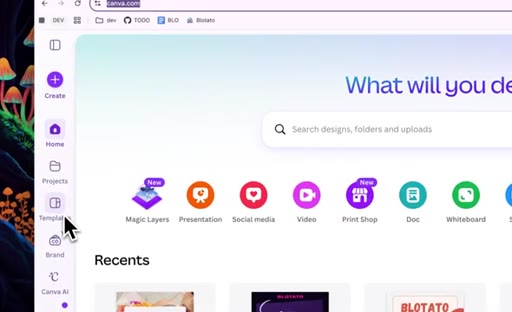
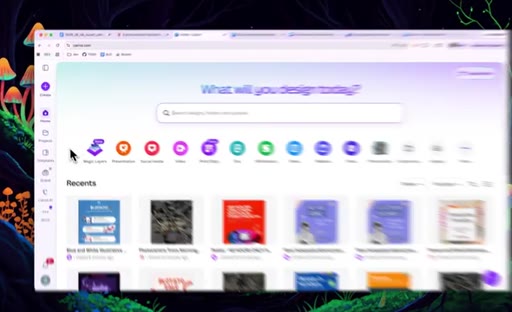
00:00 โ€“ 00:40

01 ยท Intro: Save 15 Hours a Week

Promise framing and full chapter agenda shown on screen.
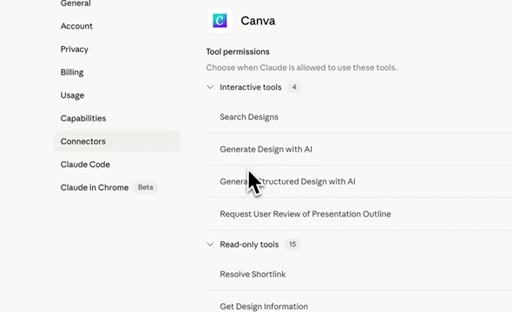
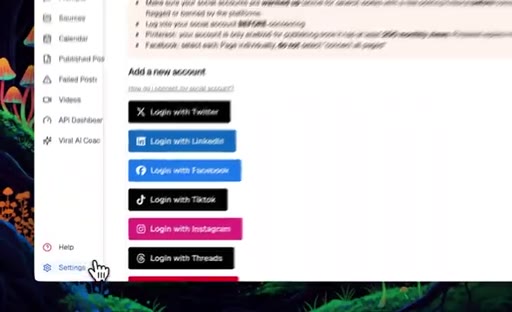
00:40 โ€“ 02:48

02 ยท Setup: Accounts and Canva Connector

Sign up for claude.ai and Canva, navigate to Settings > Connectors, add Canva, configure always-allow permissions.
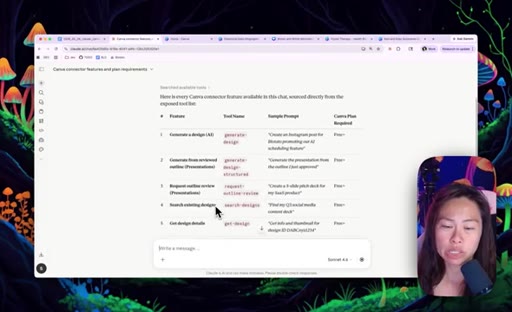
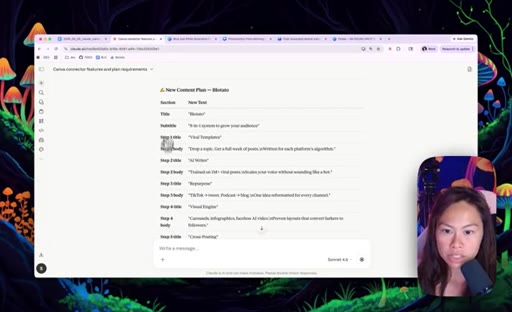
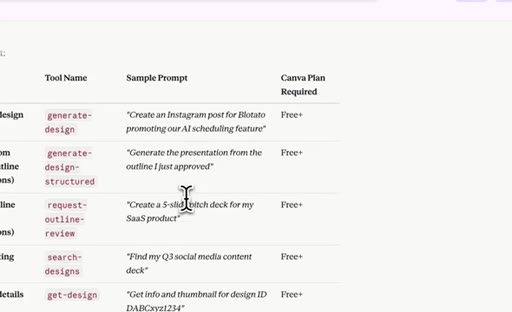
02:48 โ€“ 03:26

03 ยท Product Tour Prompt

Screenshot the connector, ask Claude to produce a feature table with sample prompts and free vs paid flags.
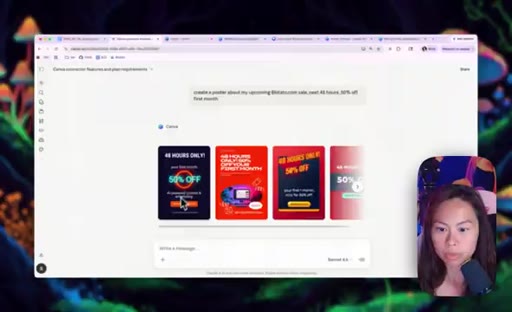
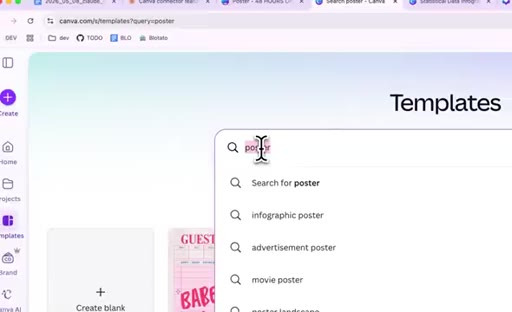
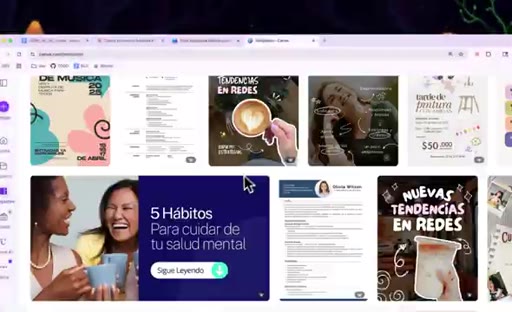
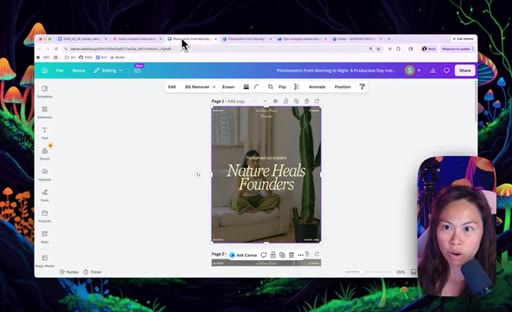
03:26 โ€“ 06:53

04 ยท Use Case 1: Poster from Scratch

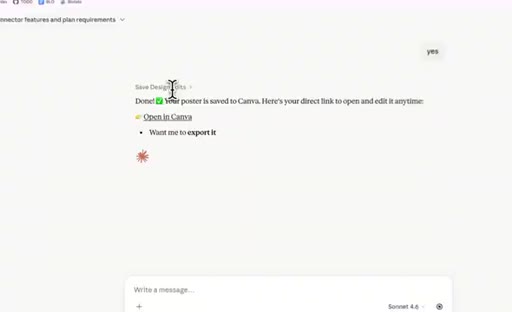
Prompt Claude to create a poster, pick from four design candidates, refine with natural language, save to Canva.

06:53 โ€“ 07:17

05 ยท New Design vs Edit Template Decision

Explains when to generate from scratch versus cloning an existing Canva template.
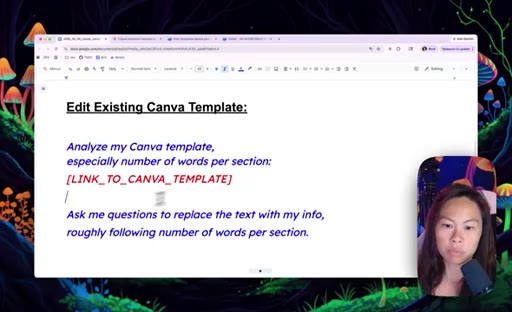
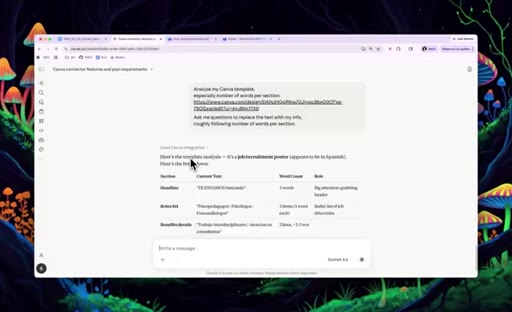
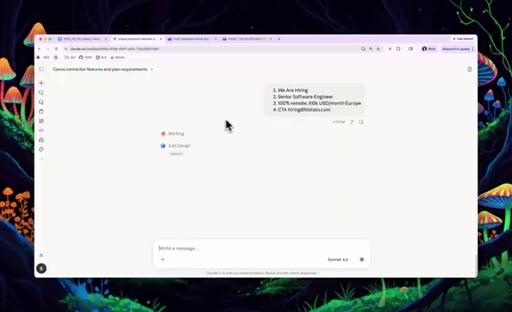
07:17 โ€“ 10:41

06 ยท Edit a Canva Template: Hiring Flyer

Clone a template, paste its URL into Claude with the word-count prompt, let Claude interview you for content, review and save.
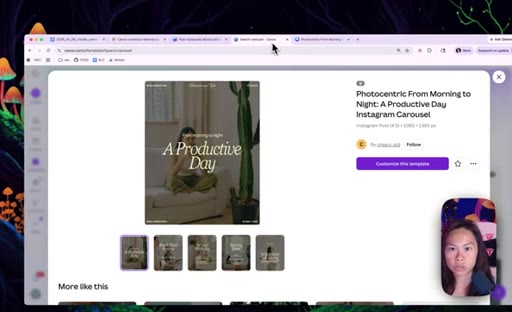
10:41 โ€“ 12:23

07 ยท Use Case 2: Instagram Carousels

Clone a carousel template, use the multi-slide prompt, approve copy plan per slide, generate and open in Canva.
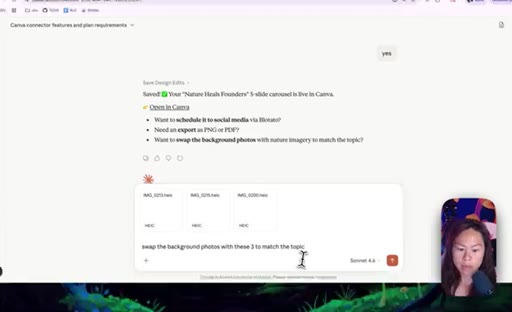
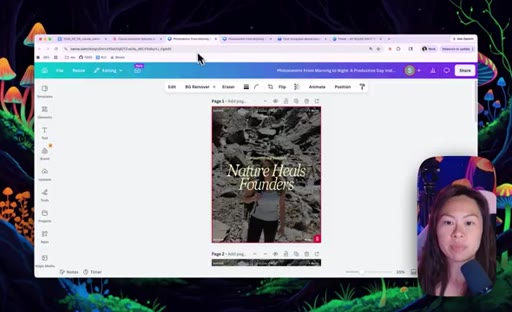
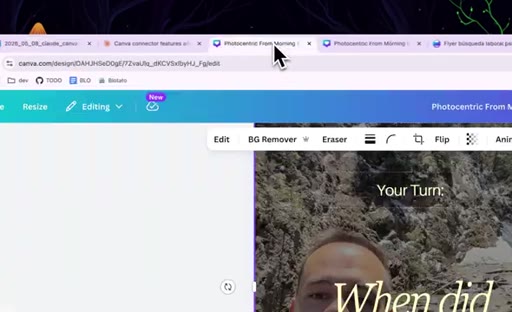
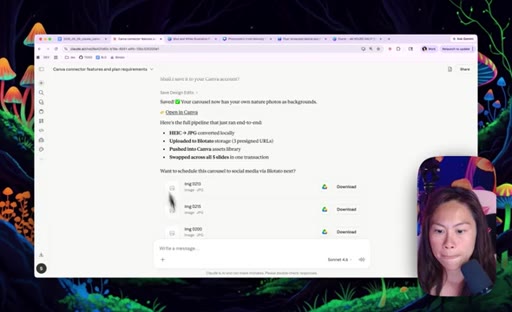
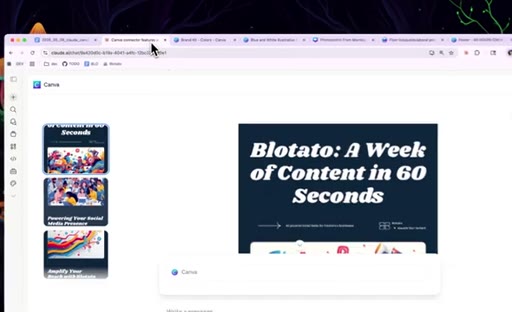
12:23 โ€“ 15:12

08 ยท Use Case 3: Own Photos via Blotato

Upload personal photos via the Blotato connector; Claude passes asset URLs to Canva to replace background images.
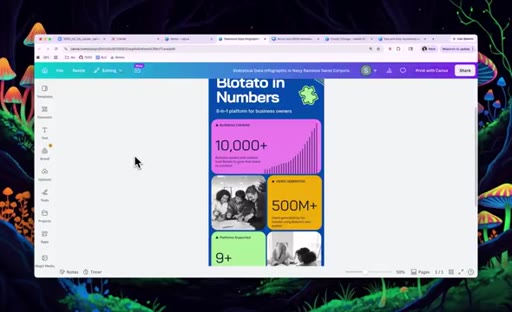
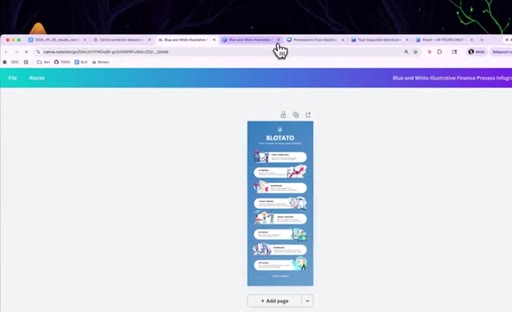
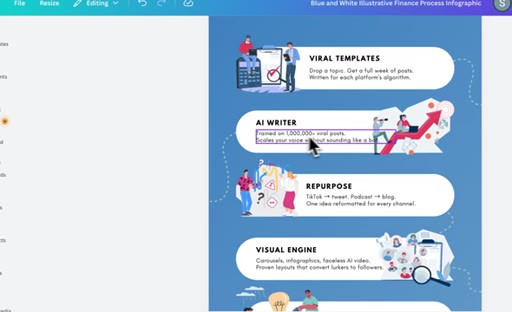
15:12 โ€“ 16:53

09 ยท Use Case 4: Numerical Infographic

Paste a website URL with the infographic template; Claude extracts stats and populates sections while respecting layout.
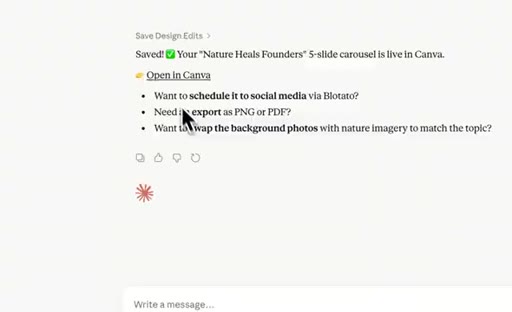
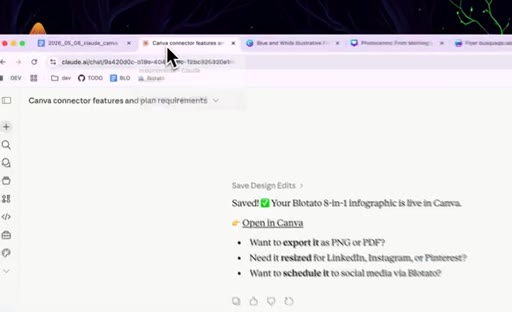
16:53 โ€“ 17:32

10 ยท Final Tweaks and Canva Sync

Edit manually in Canva after generation; changes sync automatically; tell Claude when ready to post.
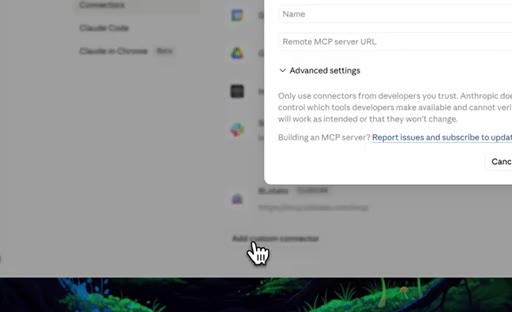
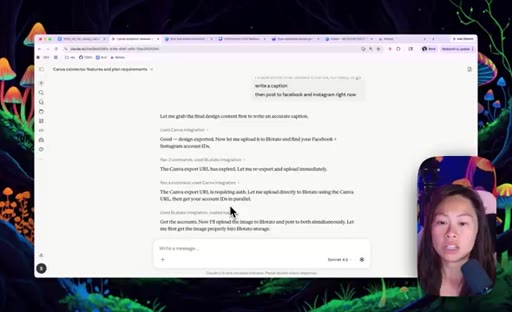
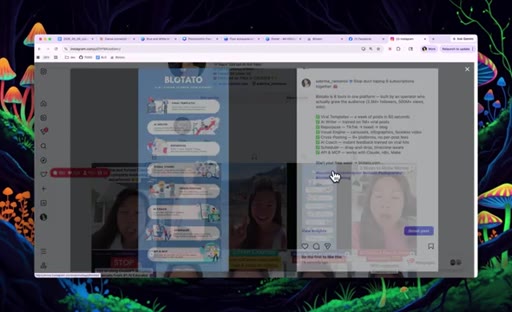
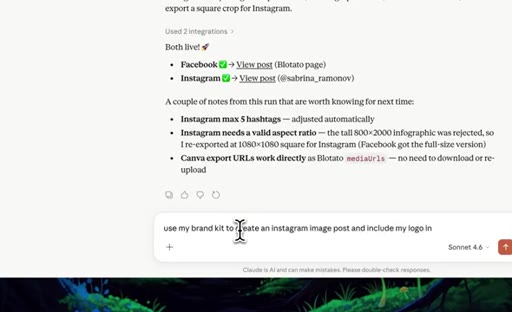
17:32 โ€“ 19:55

11 ยท Automate Posting with Blotato

Add Blotato as a custom MCP connector, instruct Claude to write caption and post to Facebook and Instagram, use calendar queue to batch-schedule.
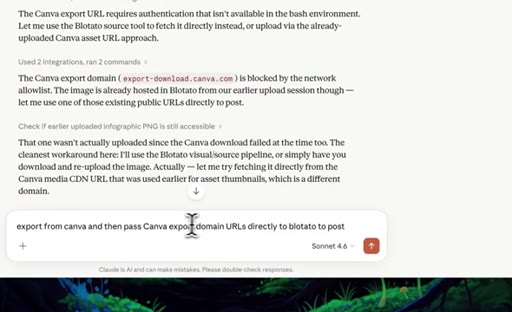
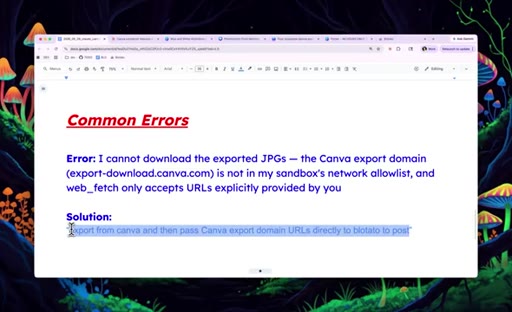
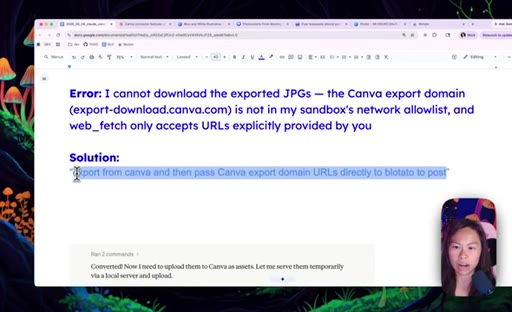
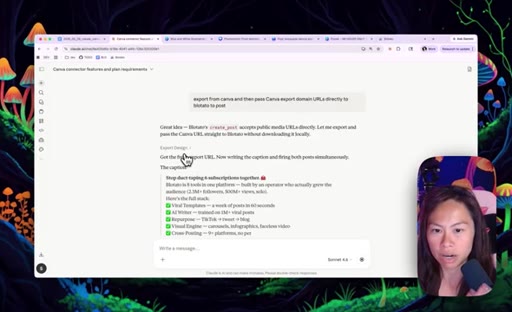
19:55 โ€“ 22:28

12 ยท Common Errors and Fixes

Canva export domain blocked error shown live, fix is to pass export URLs directly to Blotato. Second fix for asset upload confusion.

22:28 โ€“ 23:34

13 ยท Recap

All four use cases summarized: poster, template edit, carousel with own photos, infographic, plus social publishing.
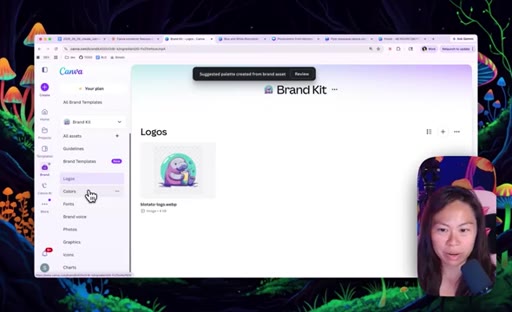
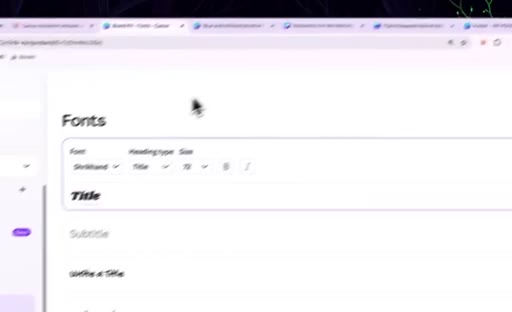
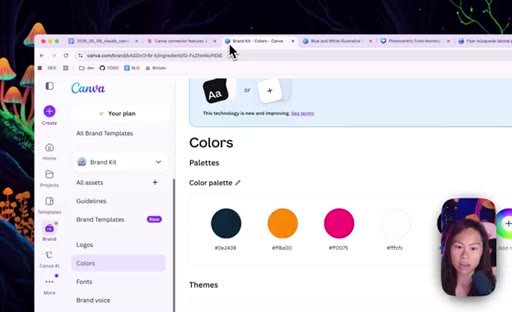
23:34 โ€“ 25:00

14 ยท Canva Brand Kit Setup (Premium)

Navigate to Brand section in Canva Pro, upload logo, set color palette and fonts.

25:00 โ€“ 27:47

15 ยท Generate Designs Using Brand Kit

Tell Claude to use brand kit; Canva returns four on-brand candidates using your fonts and accent colors; refine and open in Canva.

ยง ยท Storyboard

Visual structure at a glance.

hook: chapter map on screen
product tour prompt
use case 1: poster
template edit prompt shown
carousel template
own photos via Blotato
infographic use case
Blotato posting setup
common error shown live
brand kit setup
CTA: like, subscribe, bell
ยง ยท Frameworks

Named ideas worth stealing.

02:48 concept

Product Tour Prompt

Screenshot any new connector or tool, paste into Claude, and ask it to produce a table of all features, sample prompts, and free vs paid flags. Gives you a working reference in under 60 seconds.

Steal for Any new MCP tool, Claude connector, or SaaS integration you want to understand quickly
07:17 model

Word-Count Template Prompt

  1. Analyze template word count per section
  2. Ask clarifying questions to fill content
  3. Generate respecting layout constraints

Before replacing template copy, have Claude analyze how many words each visual section holds, then collect your content against that constraint. Prevents AI text from overflowing or breaking the design.

Steal for Any template-based design: hiring flyers, event posters, product carousels
ยง ยท Quotables

Lines you could clip.

04:55
"You can now just talk to Claude, talk to AI like you normally do without having to fiddle around dragging and dropping different layers and different assets within Canva manually."
Clean value statement, no setup needed โ†’ TikTok hook
17:23
"Everything is synced. That is the beautiful part. You can have Claude make changes. You can go into Canva manually and make tiny tiny tweaks and everything is synced."
Punchy product differentiation, standalone โ†’ IG reel cold open
21:08
"Once Claude does it once, then you can say hey Claude, remember to do this in the future whenever I am posting to social media. That way you do not have to repeat yourself again and again."
Practical memory tip, transfers to any Claude workflow โ†’ newsletter pull-quote
ยง ยท Resources Mentioned

Things they pointed at.

ยง ยท CTA Breakdown

How they asked for the click.

27:01 subscribe
"If you enjoyed this video, hit like, hit subscribe, and hit the notification bell so you do not miss my next training."

Standard sign-off at the very end. Also placed at 00:33 mid-intro before the tutorial starts, an unusual double placement that primes early droppers.

ยง 04 ยท The Script

Word for word.

HOOK opening / re-engagementCTA the pitch metaphor analogy
00:00HOOKThis is the ultimate tutorial to learn how to use Canva combined with Claude to power your entire marketing team. By the end of this tutorial, you will learn how to save fifteen hours per week creating visual assets for your marketing team and for your social media posts. For example, you'll be able to programmatically within Claude,
00:19HOOKCTAcreate infographics like this, Instagram carousels like this, Instagram carousels using your own assets like for your own photos and videos, and events promo posters like this, all within Claude and using the new Canva connector. By the way, my name is Sabrina Romanov. I've gotten millions of views on social media, and I teach AI to millions of people for free.
00:40CTASo hit like, hit subscribe, and hit the notification bell so you don't miss my next training. So the very first thing we're going to do is make sure we have our accounts set up. So if you haven't yet signed up for a claude.ai
00:51account, we're just going to use the website. Okay? You don't need Claude CoWork.
00:55You don't need Claude Desktop, and you certainly don't need Claude Code for this. We're just gonna stick to claude.ai, the website.
01:02So sign up for your account. And then we're also going to use canva.com, so sign up for an account if you haven't already.
01:09Many features will still work with a free Canva account. Okay? So you don't necessarily need to upgrade to a account just yet if you don't want to.
01:17K. Now the next step is we're going to install the Canva connector within Claude. Go ahead and on the bottom left corner, click your name, click settings,
01:26and then click connectors. Okay? The way to think about a connector is it allows AI tools like Claude to use the apps that you use every single day.
01:35For example, this Gmail connector allows Claude to read your emails and even write draft emails. K. This Google Calendar Connector allows Claude to read your calendar, and it can even update calendar events.
01:48It can create new calendar events. So what we're gonna do here is connect Canva. Click browse connectors in the top right corner, search Canva.
01:57K. Click the plus button, and now it's going to ask to connect to your Canva account.
02:02Click allow. Great. And if it works, you should see Canva here.
02:06Okay? And a lot of people do ask me for permissions, so I just wanna point out where you can see what permissions Canva has. So click configure.
02:15Okay? And, basically, this shows you all the different things you can do with Canva and also the permission associated with each one. So this check mark means always allow.
02:24So this means Canva will always be able to do things like searching through designs without asking you for permission every single time. Now you can change this. You can change this from always allow to needs approval if you want Canva to ask for your approval, for example, before editing a design.
02:41Okay. Now that we have Canva connected, let's go and start a new chat. And what we're gonna do first is what I call a product tour prompt.
02:48I like to do this with every new AI tool or connector that I'm playing around with, and it basically asks Claude to understand everything about the connector and explain in simple terms what are all the things we can do. So take a screenshot of this and drop it into Claude. K?
03:05So this is really, handy because we have a nicely formatted table here describing what is the feature in Canva connector and what's a sample prompt we can use to try it out, and does it require a paid plan or is it available on the free plan? So clearly, there are a lot of different features that you can take advantage of with the new Canva connector.
03:26We're not gonna get through the majority of these today. I'm gonna be primarily focused on creating new designs, uh, from scratch or from using existing templates, which is the main reason people use Canva. So that's why we're gonna focus on it today.
03:39So we've wrapped up installing the Canva connector and a simple product tour where you can see all of the different features. Now the very first thing we're going to do is make a poster using the new Canva connector and we're going to make from a new design. So we're not gonna start with an existing Canva template.
03:57So let's say create a poster about my
04:04potato sale.
04:18for our very first design, we're gonna ask Canva to create a poster about my upcoming potato.com sale in the next forty eight hours where you get 50% off your first month. And you see these four cards here.
04:30This is because Canva is gonna show you four distinct visual designs and you get to choose which one you like the most, and it's gonna run with that one. Okay? And you can give feedback.
04:41Like, if you don't like certain colors, you don't like the fonts, you don't like the font size, if you wanna change some of the text, you can provide all of that feedback right here within Claude, and Canva will understand it and update the design accordingly. This is what makes this integration so powerful because you can now just talk to Claude, talk to AI like you normally do without having to fiddle around dragging and dropping different layers and different assets within Canva manually.
05:10So here are the four design variations. Um, I personally like number two, actually. So
05:16so you can see the instructions, Claude saying, pick your favorite, one, two, three, or four. Once saved, I can also edit any text colors or details, and Claude can even export it as PNG or PDF so that it's social media ready. So let's say my favorites
05:31is number two. However, I want to replace the text get started
05:38now with a proof points, like zero to 2,300,000
05:44followers solo, something like that. My point here I'm trying to illustrate is you can have this back and forth conversation with Claude in order to update the design.
05:53Like, I could have asked to change the color red, like, it's a little bright. I could have asked to tone it down a little bit. You can ask to replace the text, replace different details.
06:03You can actually even upload your own images here. We're gonna get to that in a bit, but it's really cool because you can just do all of this within Claude and it's going to update to the Canva design. Everything's gonna be saved to your Canva account.
06:16Okay? So you don't lose it just because you ended the Claude conversation. When Claude asks you to save it to your account, I'm just going to say yes, and then we're gonna be able to open it and preview it within Canva directly.
06:28K. Here's the direct link to open it in Canva. K.
06:30Go ahead and click that.
06:34And here's our design with the updated text. Remember, I asked Claude to change this text, uh, to have a proof point zero to 2,300,000 followers,
06:43and this looks really, really good for an event promo flyer. So just to recap, we talked about use case number one, creating a simple poster, and we did it using a new design.
06:53Right? Notice how we didn't give Canva any pointers or, um, design decisions or design templates.
07:00What we're gonna do next is I'm gonna show you another option which I also really really love. It allows you to choose one of the many amazing templates Canva already offers and we're going to start with that template. K.
07:13So in canva.com, if you're not familiar with it, click home on the left sidebar. Click templates on the left sidebar,
07:19and this allows you to browse thousands and thousands of amazing high quality templates in Canva. Let's search for flyer. K?
07:27You can see all the different flyers here and basically just choose one that stands out to you that you actually like, and we're gonna use that one moving forward. So choose a template you like. Uh, I actually kinda like this one over here.
07:38I do not know what it says, but it looks super cute. Click customize this template on the bottom right corner, and this will clone the template to your account. So now you can make any changes you want.
07:50And here's the prompt we're going to use. Analyze the following Canva template, especially the number of words per section. Replace this with the link to the Canva template that you just cloned.
08:00Then ask me questions to replace the text with my information roughly following the number of words per section. Now the reason this part is important is because you have like different defined sections of text like this one, like this one over here.
08:15And if you were to replace this with like five sentence paragraph, it just wouldn't look good. Like, it kind of ruins the points of the design.
08:23The purpose of this prompt is we have Claude first analyze the templates, make a plan for roughly how many words per each section, and then ask us what should be our information to populate the template. Okay. So go ahead and copy paste this or take a screenshot of this.
08:42Gonna drop it into Claude, and then grab the URL. K? So grab this URL,
08:49replace it here, and then hit enter. Now Claude is analyzing the templates.
08:54It's going section by section. It's looking at the current text, how many words is it, what is the role of this section. Section.
09:00And now Claude is asking me clarifying questions like what information do I wanna put in the poster. Now you don't have to do it this way where Claude interviews you. If you already know all the information you wanted to put in the poster, you can just dump it into Claude and be like, hey, use this information.
09:15If you have a website or a blog post, you can also dump that into Claude and be like, use the information from my website. Oh, that's funny. I actually am hiring.
09:24So I'll say we are hiring, and then the role is senior software engineer. Benefits are, yeah, 100%
09:33remote, 10 k USD per month in Europe, which is, like, a very competitive salary. And then the CTA,
09:43I think it's hiring at potato.com. So now Claude and Canva are gonna work together to take the information, the context that I fed in, and create a updated version of this flyer but with my information. Save it to my Canva accounts.
09:59And the cool part here is now we can leverage the amazingly human design templates from the Canva community. Right?
10:06Instead of, uh, instead of hoping Canva will generate a new design from scratch that we'll like, we can take our time to just browse all of these templates, select the ones that we really like, and then we can reuse those. Like, we can just swap out the text, swap out the imagery to make a fresh post every single time.
10:25So go ahead and click open in Canva. Okay. And here's our poster.
10:29We are hiring senior software engineer, 100% remote, 10 k USD per month in Europe. So now we've covered creating a new design from scratch versus editing an existing template within Canva. Now I know many people wanna know, can this make carousels for Instagram, for Facebook,
10:47slideshows, for TikTok, LinkedIn carousels? And the answer is absolutely yes. Now I just put Instagram carousels here, but the visuals we create can absolutely be posted as Facebook carousels, LinkedIn carousels, and TikTok slideshows.
11:00And what we're gonna do for this is start with an existing template because Canva has lots of really nice existing carousel templates. K.
11:09So search carousel here. We're gonna choose this template here, number three. Um, I like this one because it has photos in the background, and the next use case I'm gonna show you is how to swap this out with your own photos.
11:21Okay? So go ahead and click this template, Click customize this template. It's gonna clone it to your account.
11:26And we're going to use this prompt for the Instagram carousel. It's very similar to the previous prompt. It's just a little bit more planning
11:34because we have now multiple slides and we kinda wanna approve each slide's copy before we create it. So go ahead and take a screenshot of this.
11:43K? Just like before, you're gonna replace the URL with our, uh, carousel. Now I'm going to modify this template and put in my topic.
11:52My topic is nature heals
11:57founders. K. And here is Claude's analysis of the carousels, each text section.
12:03Here's the new plan, provide feedback at this point, right, if you wanna change any of the text, and then let's say save it to our Canva account. Okay. And now click open in Canva so we can check it out.
12:16K. So for burned out builders, Nature Hills founders, I'm gonna go on a hike after filming this video. So this is top of mind.
12:22Okay. Awesome. So we have changed all of the copy in this carousel.
12:26So that's awesome. But what if we wanna change the photos too? Like, don't know who this lady is.
12:32Like, I wanna use my own photo. And really cool. It's super easy to do that with Claude.
12:37Okay? So click this plus button, click add files or photos,
12:42and then I'm just gonna throw in two vertical photos from my hike the other day. This one and I think this one. I'm actually not sure what will happen if I throw in a horizontal photo, but let's just try it out.
12:56Okay. So let's say swap the background photos with
13:02these three to match the topic. Now I'm gonna say use Votato to upload the photos so Canva can use them.
13:13Now this second line is really important because sometimes Claude gets confused, like how do I pass this, uh, photo over to Canva to use? Um, the nice thing is my AppLotato makes this super easy.
13:26I'm going to cover this a little bit later in the video just because there is a process to set it up, but thankfully, it's super simple. And once you set it up, you can do really nice things like this, like make it easy to upload your own photos, videos, and assets. If you haven't set up Blotato yet, uh, this obviously won't work.
13:42Claude will try different workarounds and you may run into issues, just a warning. So but after you install Blotato, stuff like this becomes super super easy to do. And by the way, if you're new to using AI, I highly recommend reading through what Claude is actually thinking here.
13:59Like, it's explaining to you exactly what it's doing. I'll use photo one for slides one to two, photo two for slides either four, etcetera. Now it's swapping all of the backgrounds, and now it's saving it to Canva.
14:11Okay? Okay. And now it's done.
14:13So click the open in Canva link. Okay. So now we see the Instagram carousel, and you can see now it's using my first photo.
14:20Right? So nature heals founders, and then here's a picture of me on a recent hike just a few days ago. And then this is another picture that I also uploaded.
14:27It was not able to handle that horizontal photo that I was just testing out, so that's good to know. So just make sure your photo dimensions
14:35roughly match, um, the photo slot. So if the photo slot was a square, just be mindful of that. Here, the photo slot is the vertical background.
14:46Right? So Canva's going to prefer a photo that actually fits that profile. So now we just talked about cloning a Canva template in order to make an Instagram carousel.
14:56We used Claude to customize the contents in that carousel, and we uploaded our own photos to be used within the carousel. So now you can see we're building upon, um, all the different building blocks that are available in Canva and Claude and getting to more complex use cases.
15:12At the end of the video, I'm gonna talk about how do you automate posting this to social media to multiple platforms within Claude. The last use case I wanted to show you is creating an infographic. So again, we're gonna go to home in Canva,
15:27click templates, and then search infographic. Okay. So find the template that you like, okay, here, and then click customize this template.
15:35Again, this clones it to your account, so now you can make changes. So we're gonna use a similar prompt as before, but I'm going to tweak it so that it just uses information that's already on my website. So replace the
15:49text with information from my website. So I'm showing like a couple different variations here.
15:55For the very first use case, we had Claude interview us and ask us, hey, what is the content you wanna put in this template? In the second use case, we had Claude plan it out just based on a simple topic. And in this use case, we are giving our website to Claude so he can analyze it and then creates a plan for how to update the information in this infographic.
16:17K. So it's analyzing the templates. Now
16:20it's creating the contents plan based on all of the stuff that's already on my website, and it now it is creating the infographic within Canva. So the logo that you see here is the tool that's being used.
16:33So this means Claude is calling the Canva tool right now. Okay. Now we have our infographic live in Canva.
16:41Click open in Canva so we can check it out. And boom. This is all stuff from Blotato.
16:46Viral templates, AI writer, repurpose. This This looks really good actually. Okay.
16:52Um, that's great. Um, and then one thing I wanna point out here, this is another option. Let's say it messed something up or you just wanna make some slight tweaks, some slight edits to get the design to perfection.
17:03So for example here, I don't love like this font and how it makes 1,000,000 look. So I'm just going to edit this real quick. So it says 1,000,000
17:13spelled out. Now, Canva automatically saves everything and this is all synced. So I can make an edit here in Canva, my final edits here in Canva, and then I can go back to Claude and say, hey, it's ready to go.
17:26Now post it to social media. Now before I demo that, we have to just set that up. And I built my own app to help me do do this.
17:34I personally use Claude with Blotato in order to distribute tons of content each week completely solo. Okay. The only caveat here is to use the API.
17:45It does require a paid plan of $29 per month. This is because it helps filter out spammers, which the social platforms don't like. But if you're unhappy for any reason, you can get a full refund, no questions asked.
17:57Okay? So I just make it super easy. So once you sign up, go to settings in the bottom left corner.
18:02Okay? This is where you connect all of your social accounts. And on the lowest tier plan, you can connect up to 20 social accounts on any platform.
18:11So you could connect 20 Instagram accounts or 20 Facebook accounts or 20 LinkedIn accounts. Okay. So go ahead and do that.
18:18The last step is to connect Bloatato to Claude just like we connected Canva to Claude. So go to settings.
18:26K. Click connectors just like before. And the only difference is we're gonna have to add a custom connector.
18:33Okay? So click add custom connector, call it bloatato,
18:37and then you wanna type this into the URL, mcp.bloatato.com/mcp. Go ahead and click add. Then it's gonna show up here, and there will be a button that says connect.
18:50So go ahead and click that. And just like when we connected Canva, it's gonna redirect you to an authorization page, and you should be good to go.
18:58Okay? So now let's go back to our chat. And then let's just tell Claude, like, I made some final tweaks in Canva.
19:07It's ready to go. Let's say write a caption, then
19:14post to Facebook and Instagram right now.
19:20Now what's really cool with Blotato is you can have Claude manage your entire content calendar. That means it can publish posts right now, it can schedule posts in the future. You can even set up calendar slots, like if you go to calendar
19:33weekly schedule, basically, you can see all of the different time slots where you can post for these social accounts. So what you can do is like use Claude and Canva to make content and then just schedule it out onto the queue.
19:47So if you sit down to batch content for the day, you set up this queue and it'll just like schedule everything out to the time slots where it's supposed to be. If Claude runs into any issues like exporting JPEGs
20:00or just exporting any visuals, this is the simple solution to it. All you have to do is push back on Claude and say, export from Canva and then pass the Canva export domain URLs directly to Blotato to post.
20:14Claude will know what to do with this information. Okay? So you you need to do this if you start seeing errors or complaints from Claude that the Canva export domain is not in my network, etcetera etcetera.
20:26It's like a very scary sounding error message, but there's a very simple fix. Um, Similarly, if Claude gets confused that it has to upload assets to Canva, again, you can just say, use Bloatato to upload my photos or videos so Canva can use them. Okay?
20:40These are the two most common errors people get stuck on. Okay? But the solution is actually very simple.
20:47Once Claude does it once, then you can say, hey, Claude. Remember to do this in the future whenever I'm posting to social media.
20:54That way you don't have to repeat yourself again and again. So here's an example where Claude is getting confused about how to I, like, grab this Canva export URL and get it to social media. Right?
21:03So here, Canva export domain blocked by the network. So again, if you see something like this, just stop Claude thinking. In some cases, it'll eventually figure it out, but let's just make it really easy for Claude and tell it exactly what to do.
21:17Now it says, great idea. Okay. Yes.
21:20So basically, all that's happening here is Canva already has exported URLs. We're just gonna take those URLs,
21:27pass it directly to tato because blow tato knows what to do with it. It's gonna post it to social media and you don't have to worry about converting it or permissions or anything like that. So now the Facebook post is live.
21:38Instagram initially rejected the first post because of the aspect ratio, but really cool, Canva and Claude were able to work together to export a square crop for Instagram. So I probably shouldn't have posted this really long infographic to Instagram.
21:52Um, maybe I should have done this carousel as an example instead. But yeah, hopefully, you get the idea. Um, let's check Facebook to see if it posted.
22:00And here, Blotato actually returns the exact post URLs. Okay? So view you can click view post.
22:05Click view post here to get it. Um, here is the infographic on Facebook.
22:10Okay? And then I'm going to refresh my Instagram right now. And here is the infographic for Instagram, which actually did
22:17work at this awkward aspect ratio, but still really cool. And you can see it was posted twenty eight seconds ago.
22:23So just to recap, we've created a simple poster starting with a new design. We also tried it starting from an existing Canva templates. We've also made Instagram carousels.
22:33We uploaded our own photos to be included in Instagram carousel, so using your own media. We also created an infographic just using information already available in our website,
22:45and I showed you how to make final tweaks to the infographic before exporting it to social media. Everything is synced.
22:52That's the beautiful part. You can have Claude make changes. You can go into Canva manually and make tiny tiny tweaks and everything is synced.
23:00And then I showed you how to automate posting to social media platforms. Now I showed you Facebook and Instagram, but with Blotato, you can also post to LinkedIn, threads, blue sky, Twitter,
23:12even TikTok slideshows, etcetera. You can even post Instagram stories, Facebook stories, Instagram trial reels.
23:18So just really really powerful because you can have Claude schedule everything out, publish everything from within Claude. You don't even have to go anywhere else. Now the last thing I'll talk about, I saved this for last because it requires a premium Canva subscription.
23:33Okay? So you won't have access to this if you're on a free Canva account, but it is a really powerful feature. So I at least wanted to talk about it.
23:42So let's go back to Canva. And on the left sidebar, there's a button that says brand. Notice it has this crown icon, which means it requires a paid plan.
23:50And this is where you can input your brand's guidelines. So we're just gonna start off with simple ones. So first thing for example, here, I'm going to add my Bloatato logo.
24:00Boom. K.
24:05Little blurry, but we'll still use it. And then these are my color themes. So it actually just imported this from the Bloatato logo.
24:13I don't love it. I like my original color palette of, like, bright orange, bright pink. Um, these are the fonts in my theme.
24:21If you want to change this, for example, I can click that. Uh, let's say I just want a different cool font. Like, this is pretty cool.
24:27K. Click save. Okay?
24:29So now this is my fonts brand kits. And there's a lot of other stuff you can add here, guys. Brand voice, your photos, your graphics,
24:37charts, um, guidelines is really in-depth, uh, so I'm not I'm not gonna fill this out, but certainly highly recommend you take the time to. So brand guidelines, purpose, about the brand, mission, vision, logo, primary logo, secondary.
24:51You don't need to do all of this if this is your first time. Okay. So I'm just starting with logo,
24:56colors, and fonts just to keep it super super simple. Okay. So now let's go back to Claude and say, use my brand kit
25:05to create an Instagram image post and include my logo
25:10somewhere. I don't know. I'll let Claude and Canva figure out where to include my logo.
25:16Um, but this is really cool because Canva has access to your brand kits. You can have multiple brand kits, by the way, if you have multiple clients.
25:23You just specify which brand kit you want Canva to use. Now it says it's got my brand kit, now it's generating the Instagram post and I'll ask Canva to include my logo and brand colors and fonts. Now remember the first example, when we generate something from scratch instead of a Canva template, Canva is going to give us multiple design options, four design options.
25:44Then we choose the design direction we like best, and then we tell Claude and Canva to, like, oh, edit this copy, maybe change the fonts, maybe change the colors, any other edits that you wanna make.
25:58I do like two. Okay. So I'm gonna say use two,
26:02but use more of my brand colors like the
26:07accents. So I can I can tell it is using my brand kit because of the fonts that it's using? So if you look at this number two, like this font and stuff, and this really dark blue background is this color.
26:19However, I do want it to use more of my accent colors, orange and pink. So I'm just gonna give that feedback to Claude in Canva, and hopefully, it listens to it.
26:30Uh, by the way, another quick thing I'll point out is you can actually open any of these variations in Canva. Right? So click open in Canva here, and it will take you straight to it.
26:39So overall, I just love how streamlined and how well integrated the Canva connector is within Claude. Like, it's a quite a thoughtful user experience. So
26:50oh, okay. So I actually really like this fourth one here, and you can see it's using more of my brand colors. So like this gradients
26:57CTAfrom orange to pink, right, these are my two brand colors here. Right? So this one's pretty cool.
27:04CTASo I'm gonna open this in Canva and then you can see like this particular, um, kind of comic book like fonts. If I go to my brand kit fonts, that those are my fonts for the title and subheading.
27:15CTASo you can see how it's using the brand kit there. Okay. So just to recap, we covered Claude and Canva, how to set everything up, how to generate new designs, how to use templates for your designs, how to make final tweaks and edits before finalizing and exporting to social media, how to actually publish to social media, schedule to social media, and how to create a Canva brand kit that Claude can also use to make on brand designs at scale.
27:41CTAIf you enjoyed this video, hit like, hit subscribe, and hit the notification bell so you don't miss my next training.
โ€” full transcript
ยง 05 ยท For Joe

Four skills that unlock the full Claude + Canva workflow.

WHAT TO LEARN

The connector removes the drag-and-drop layer entirely, but only if you know the four prompt patterns and the two places where it breaks.

  • The product tour prompt, screenshot a connector and ask Claude to table all features and sample prompts, takes 60 seconds and gives you a reusable reference applicable to any new tool, not just Canva.
  • When editing a template, always have Claude analyze word counts per section before replacing copy; this single constraint prevents AI text from visually breaking the layout.
  • Canva returns four design candidates every time you generate from scratch; always pick a direction before asking for edits, or Claude may commit to a design you do not like.
  • The Canva export domain is blocked from Claude sandbox by default; the fix is one instruction: export from Canva first, then pass the export-domain URLs directly to Blotato to post.
  • Claude can remember workflow fixes across a conversation; telling it once to always use the export-URL approach means you never have to repeat the workaround again in that session.
  • Photo slots in templates expect a matching aspect ratio; vertical background slots reject horizontal images, so matching dimensions must be confirmed before uploading to a carousel.
  • Canva Brand Kit (Pro) propagates logo, color palette, and fonts into every generated design automatically; setting it up once eliminates per-prompt brand instructions permanently.
  • Blotato supports a weekly calendar queue; designing in bulk and scheduling to pre-set time slots means a single Claude session can fill an entire week of social posts.
  • Manual edits made directly in Canva after Claude generates a design are fully preserved; the two tools stay in sync, so you never have to choose between AI speed and human polish.
ยง 06 ยท Frame Gallery

Visual moments.