Gabriel VIP · Youtube · 11:47

Ultimate Key Light for YouTube Cinematic Videos in 2026

An 11-minute field test of the Godox ML100 Bi — three lenses, two softboxes, three room configs — to answer the question every home-studio creator is actually asking.

Posted
May 18th 2026
today
Duration
11:47
Format
Tutorial
educational
Channel
GV
Gabriel VIP
§ 01 · The Hook

The bait, then the rug-pull.

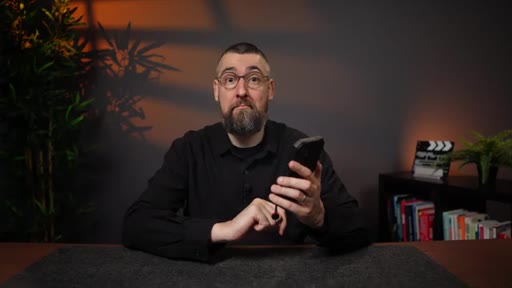
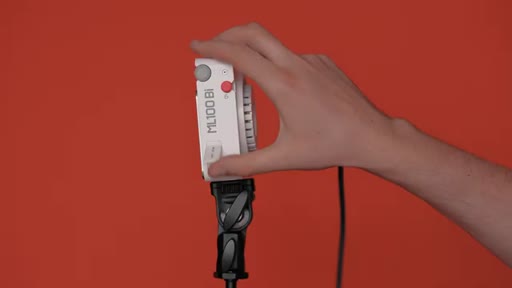
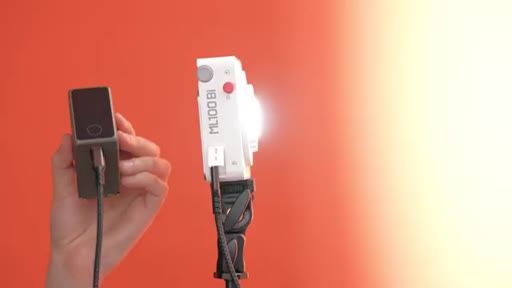
Gabriel VIP opens with the question every home-studio creator eventually hits — and refuses to give a lazy answer. Instead of a hot take, he sets up a structured test: three lenses, two softboxes, three room scenarios, one compact light. The Godox ML100 Bi is named inside the first 35 seconds, but the verdict is withheld until minute ten.

§ · Stated Promise

What the video promised.

stated at 00:10 "I will share my experience with lights and small studios. I will also show you a light that checks almost all the boxes for a small home studio." delivered at 09:30
§ · Chapters

Where the time goes.

00:00 – 00:35

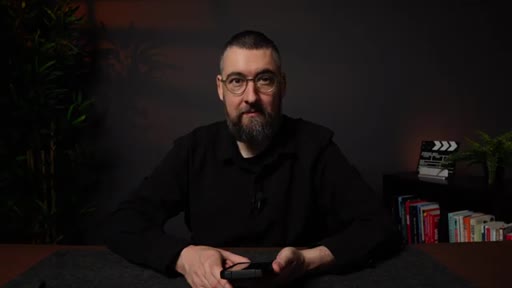
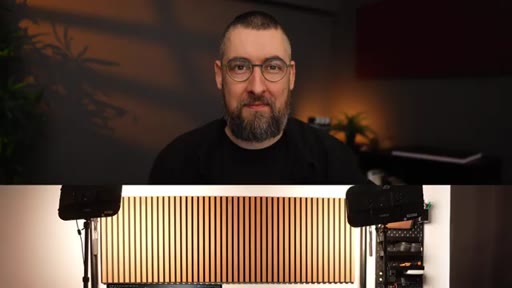
01 · Cold open + product intro

Question hook, Godox ML100 Bi named, promise of structured test stated.

00:35 – 02:07

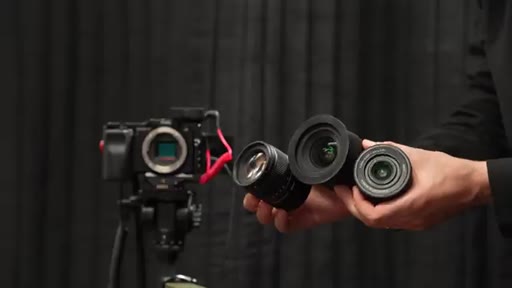
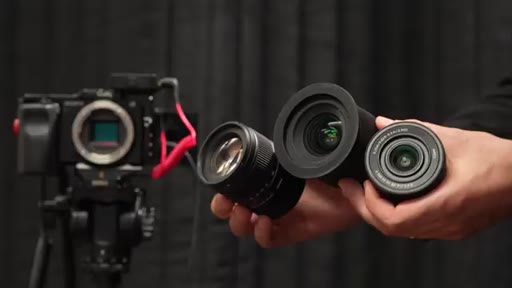
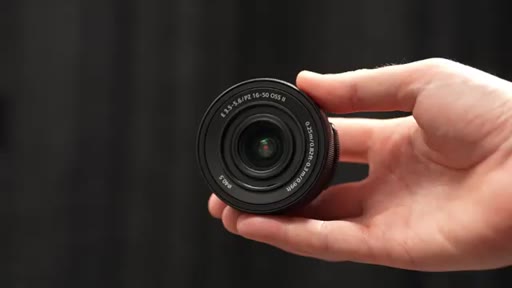
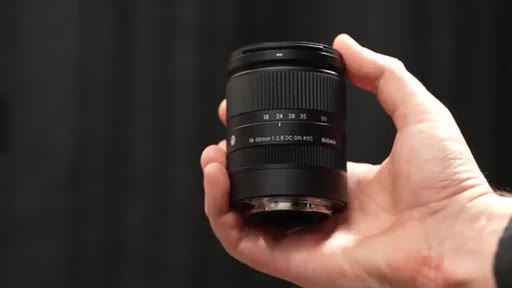
02 · Factor 1 — The lens

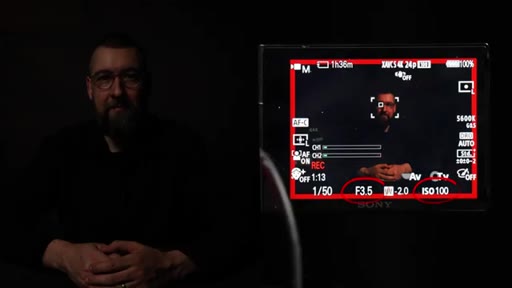
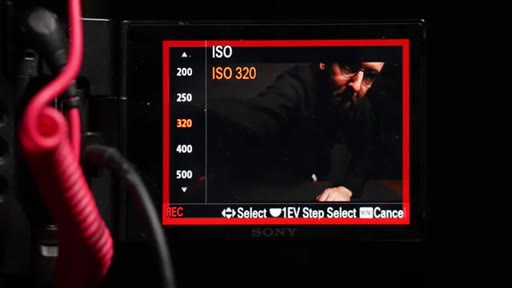
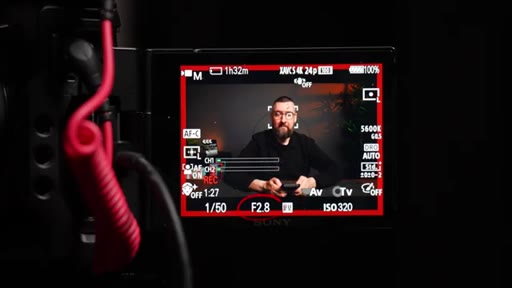
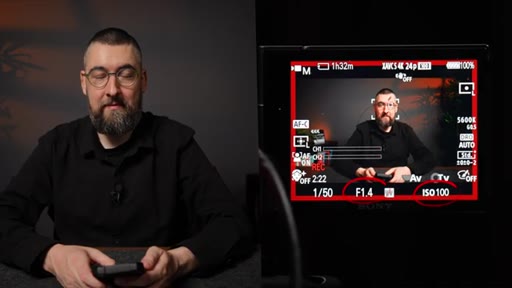
Kit lens f/3.5 at ISO 100 undershoots exposure. ISO bumped to 320, then 640 at 75% power achieves 70% zebra. LED panel added for fill. Fast lens tested at f/2.8 and f/1.4.

02:07 – 04:44

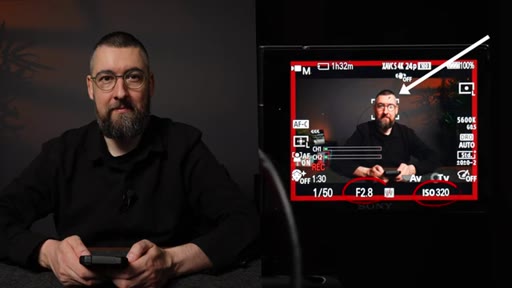
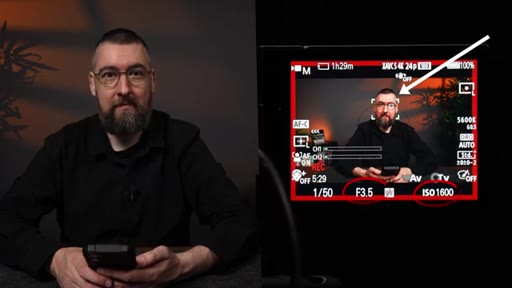
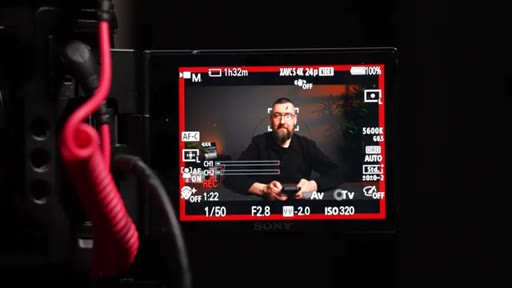
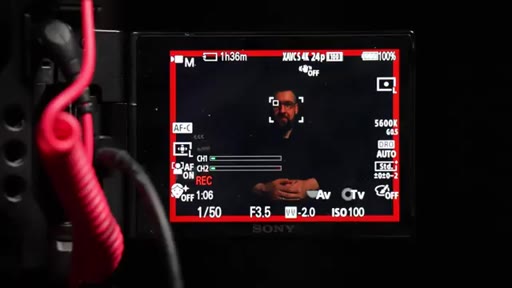
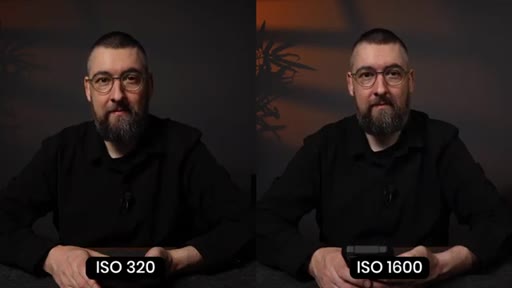
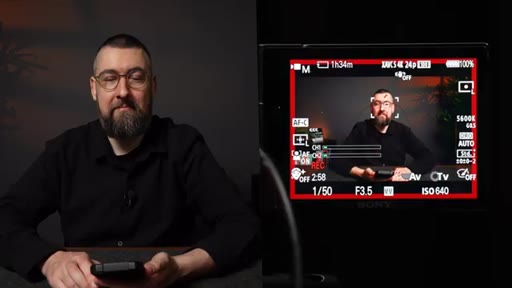
03 · ISO vs. light relationship demo

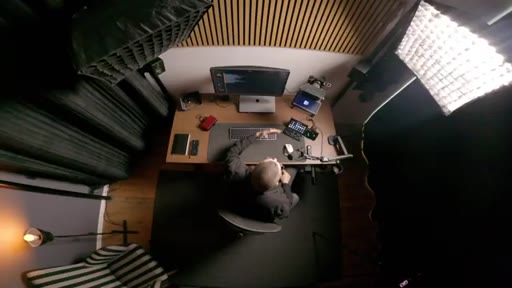
Live demonstration: ISO 320 + light at 100% vs ISO 1600 + light at 19% — same skin exposure, different image character. Room is 11x9 ft, subject-to-softbox distance ~5 ft.

04:44 – 06:37

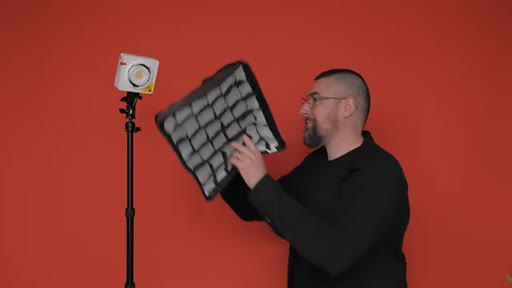
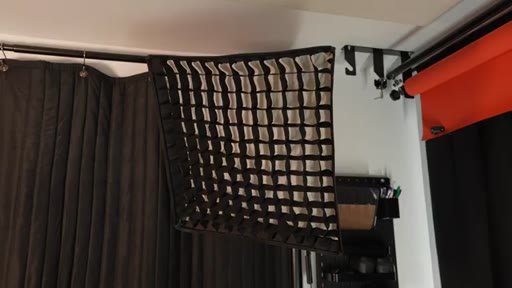
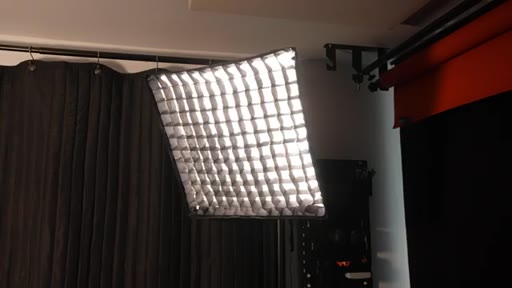
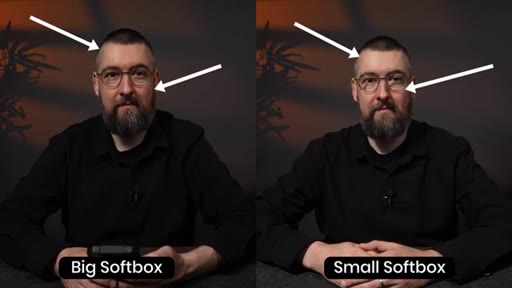
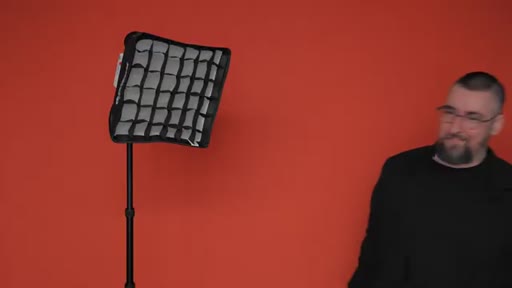
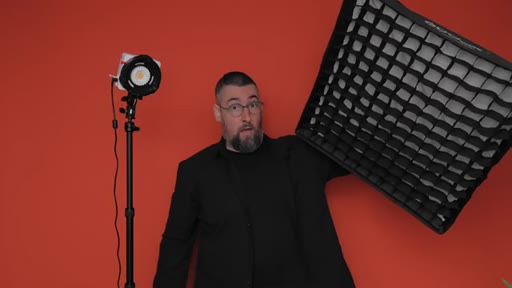
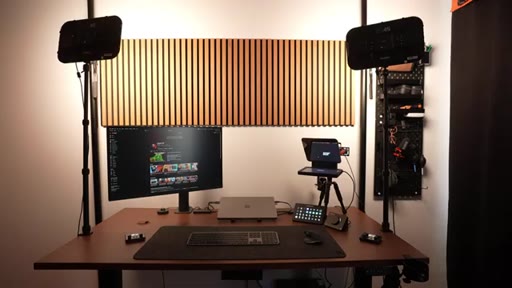
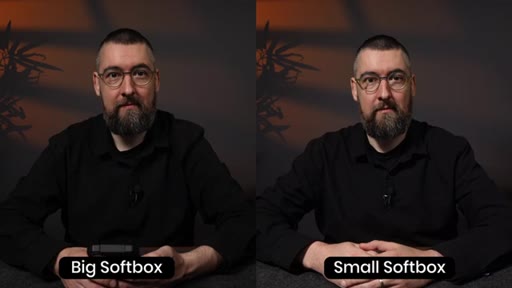
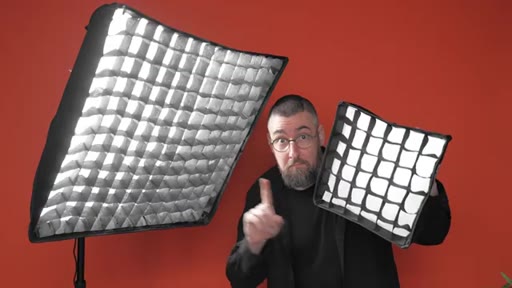
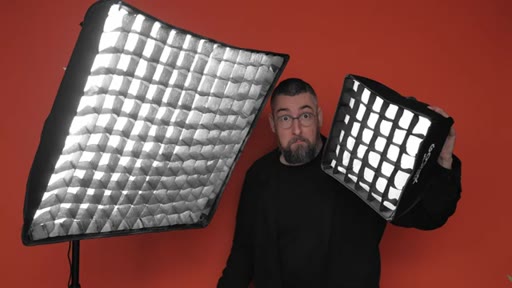
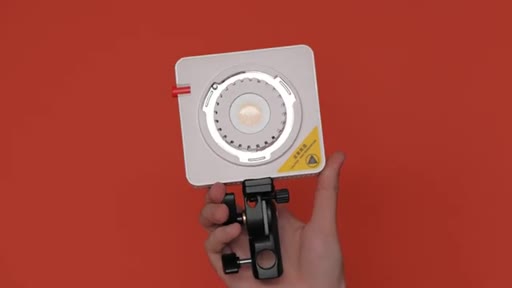
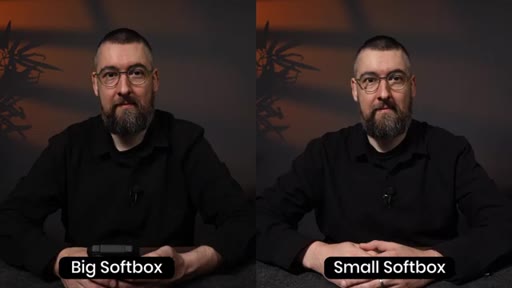
04 · Factor 2 — Softbox size

Side-by-side 24x24 vs 11.8x11.8 inch softbox. Bigger box = softer shadows, less harsh skin. Prices: small softbox $39, Bowens mount adapter $19, large softbox ~$50.

06:37 – 07:39

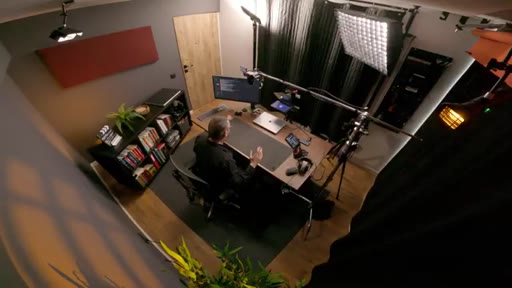
05 · Factor 3 — Room space

Decision tree: room depth allows softbox; desk against wall favors LED panels. White wall bounce option covered.

07:39 – 09:30

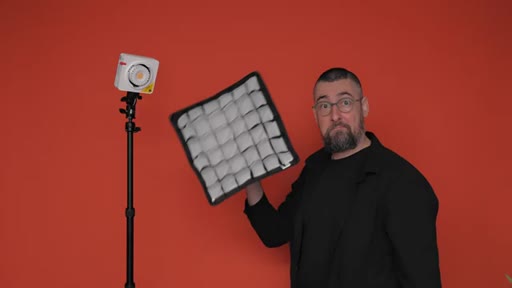
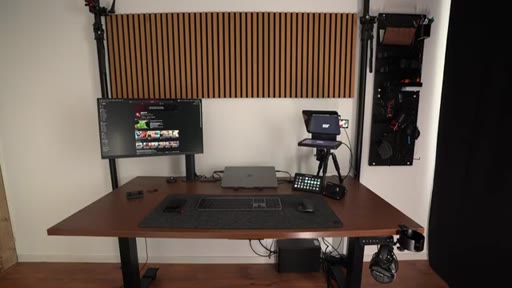
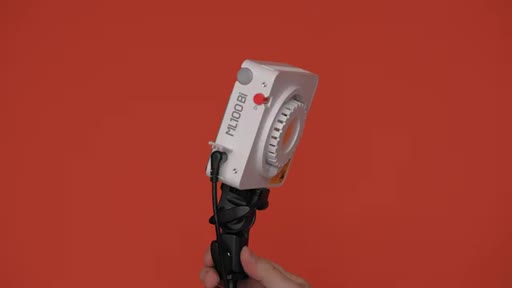
06 · Why this specific light

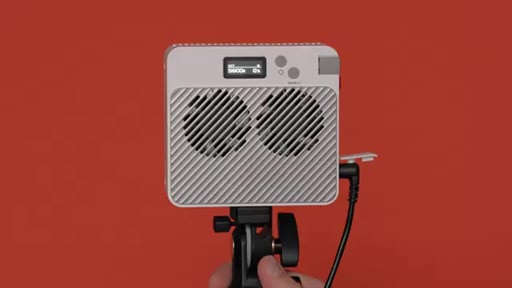
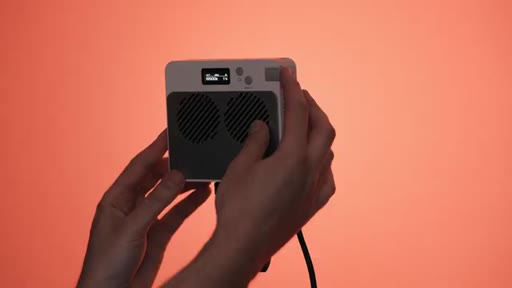
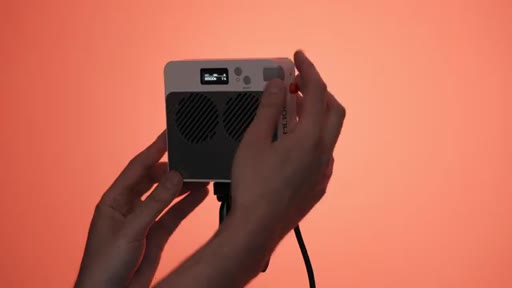
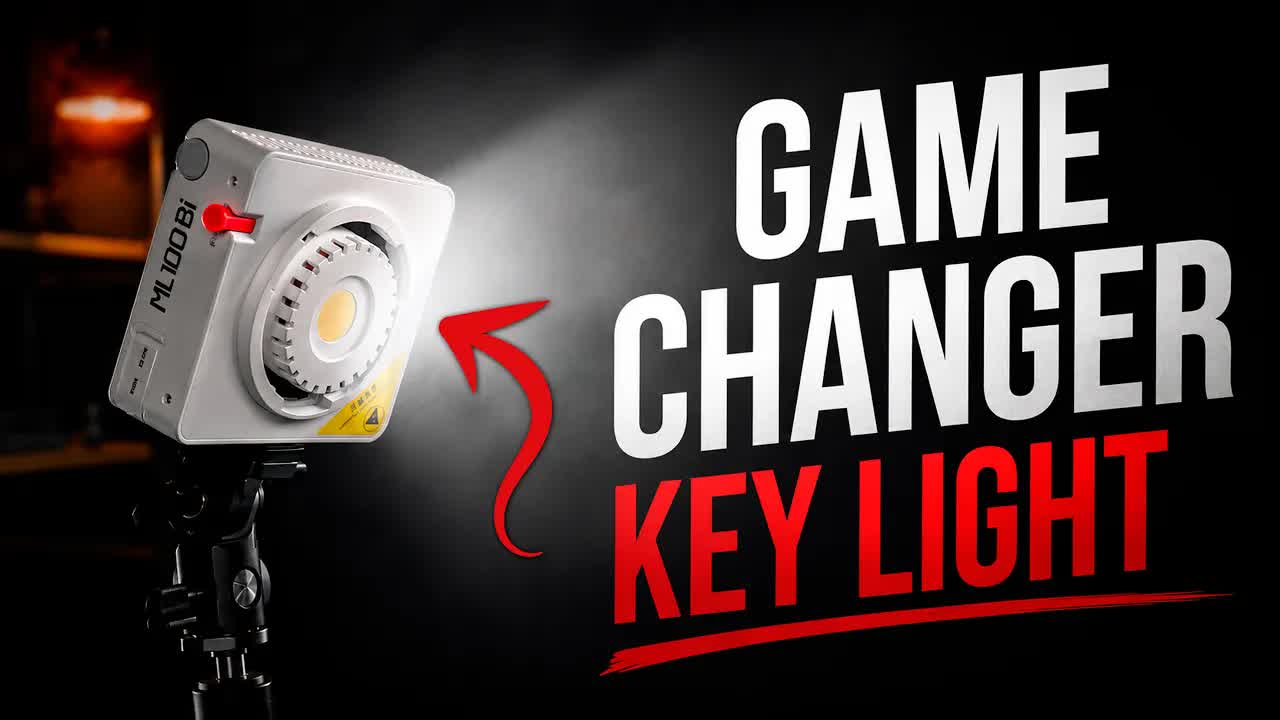
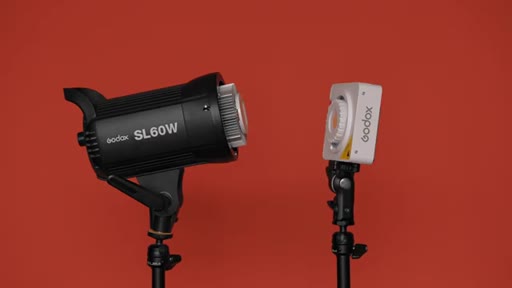
Compact size versus classic video light (Godox SL60W). Quiet fans. Godox ecosystem app control. Bicolor. USB-C power bank compatible. Build quality praised.

09:30 – 11:05

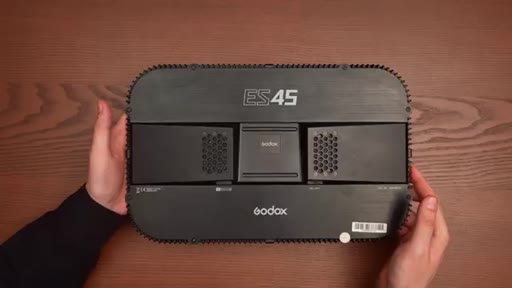
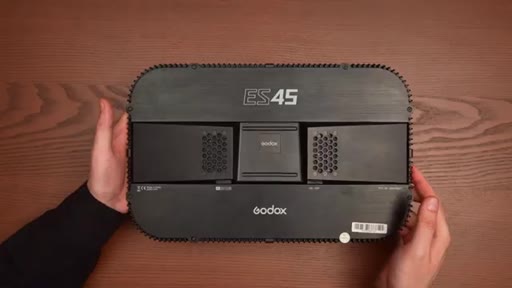
07 · The caveat + LED panel comparison

Desk-against-wall scenario still favors LED panels (no fans, desk-clamp stands). ES45 and Elgato key lights mentioned. ML100 Bi ideal when light angle is controllable.

11:05 – 11:30

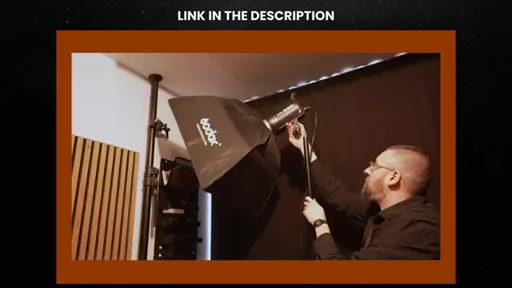
08 · Price + affiliate CTA

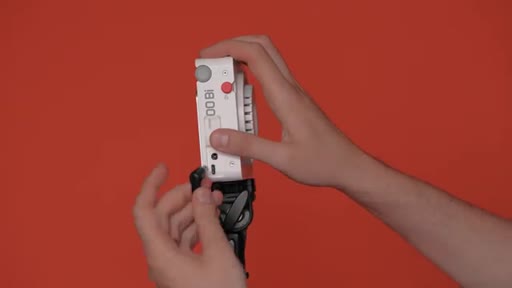
ML100 Bi ~$199, stand ~$50. Affiliate links framed as keeping sponsors off the channel.

11:30 – 11:47

09 · Lighting masterclass outro

Teases a dedicated full lighting masterclass video. Yellow neon border end card.

§ · Storyboard

Visual structure at a glance.

open
kit lens test
ISO split screen
softbox split screen
room overhead shot
SL60W vs ML100 size
affiliate CTA
outro card
§ · Frameworks

Named ideas worth stealing.

00:35 list

Three-Factor Cinematic Lighting Framework

  1. The lens (aperture)
  2. The softbox size
  3. The room space available

Three variables that determine whether a light achieves a cinematic look in a small studio. Addressed sequentially with live tests.

Steal for Any gear review or setup tutorial — structure the decision tree explicitly rather than just listing specs
02:07 concept

ISO vs. Light Direction tradeoff

Higher ISO brightens the whole image uniformly; more light from a point source illuminates only where it is aimed. Neither is wrong — preference for ambient-bright vs directional-dramatic.

Steal for Any photography or video tutorial explaining exposure controls
§ · Quotables

Lines you could clip.

02:22
"This is what people consider cinematic — a main light positioned in a way to illuminate half of the face more and another one that will only fill the other side of the face at a lower intensity to create dynamics."
Concise definition of cinematic lighting most viewers have never heard stated this clearly → TikTok hook
04:14
"There is no right or wrong ISO. It's a matter of preferences."
Permission-giving line that relieves beginner anxiety — high shareability → IG reel cold open
11:19
"You can choose the best light for nothing if you don't know how to position it right, how to use it, how to balance it with the entire scene, or set the exposure."
Strong bridge line reframing gear as secondary to technique — great hook for a technique video → TikTok hook
§ · Pacing

How they spent the runtime.

Hook length35s
Info densityhigh
Filler5%
§ · Resources Mentioned

Things they pointed at.

01:47productGodox ML100 Bi
02:58productSigma 60mm f/1.4
06:22productBowens mount adapter for ML100 Bi ($19)
07:53productGodox SL60W (size comparison)
09:14productSmallRig NPF battery
10:19productGodox ES45 LED panel
10:19productElgato Key Light
§ · CTA Breakdown

How they asked for the click.

11:05 link
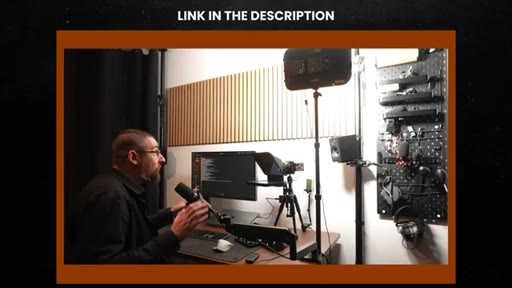
"I will add affiliate links in the description. If you click on my links, you're not going to pay anything extra, but I will earn a small commission. This will help me keep sponsors away from this channel."

Clean and honest. Framing the commission as the mechanism that keeps sponsors away is a smart trust flip — viewers feel they are supporting independence rather than being sold to.

§ 04 · The Script

Word for word.

HOOK opening / re-engagementCTA the pitch analogy
00:00HOOKWhat is the best video light to film YouTube videos in a simple home studio and achieve a cinematic look? The truth is it depends on many factors. And to help you make an informed decision after watching this video, I will share my experience with lights and small studios.
00:15HOOKI will also show you a light that checks almost all the boxes for a small home studio, the Godox ML 100 b. You will see how the image looks with a small softbox, a big softbox with different lenses and settings. In a small home studio, we have a few main problems to overcome to achieve good lighting and that cinematic
00:35look. And the main light is the primary factor that can help or destroy the look you want to achieve. Let's take them one by one and solve them.
00:44First, the lens we use. Long story short, if we use the kit lens, almost all cameras come by default with cheap lenses with f 3.5, f 5.6.
00:55This means we need more light to avoid increasing the ISO value too much. If you use a more professional lens, a fast lens that can go to f 2.8 or even f 1.4, you need less light.
01:08Let's test whether the Godox ML 100 b is powerful enough for the kit lens. This video is not sponsored. I bought the light with my own money because many creators ask me about cinematic video lights with soft boxes,
01:21not just LED panels, I had used for so long. Now I use the kit lens at f 3.5
01:28and ISO is set to 100. I also use a 24 by 24 inch softbox and agreed. I want to see if I can reach the right exposure which means around 70% using the zebra feature without increasing the ISO value too much.
01:43With the light at 100%, ISO at 100 and f 3.5,
01:48I'm not even close to reaching the right exposure. Let's increase the ISO and see when it reaches 70%. With the ISO at 320,
01:57the exposure it's almost right. I will try increasing the ISO to 640 and reducing the light at 75%.
02:06This works perfectly. And I will also turn on an LED panel on the left side just to fill up the other side of the face a little. ISO 640
02:17for modern mirrorless cameras, it's a low value. You don't need to worry about noise.
02:22This is what people consider cinematic, a main light positioned in a way to illuminate half of the face more and another one that will only fill the other side of the face at a lower intensity to create dynamics.
02:37And for this kind of result, the main light is extremely important. Now, if I use an f 2.8 lens, I can decrease the ISO to 320,
02:47for example, and keep the light at 75% to reach an exposure around 70%. And now with a faster lens like my favorite Sigma 60 millimeters f 1.4 at f 1.4,
02:58I have the ISO at 100 and the light at 66% and the exposure is perfect. But I prefer to keep the ISO at 320
03:07to lift the shadows a little and the light at 19%. The difference in noise between ISO one hundred and three hundred and twenty, it's unnoticeable. But with the light at 19%,
03:19the fans of the light will rarely engage. We will discuss the sound noise this light produces immediately.
03:26But it's super important to understand the relationship between the ISO and the light. Watch this demonstration.
03:33I now have the lens at f 3.5 and the light at 100%. The ISO is 320.
03:41The skin is exposed at around 70%. I also have the fill light turned on and keep it at the same brightness. I will increase the ISO to 1,600
03:51and decrease the light at 19%. The skin is still exposed to around 70% and it's still correct.
03:59With a higher ISO, the whole image is brighter. ISO value increases the amount of light captured overall.
04:07Increasing the light and lowering the ISO will illuminate only the area the light is pointed at. Both are correct. There is no right or wrong ISO.
04:18It's a matter of preferences. What do you prefer? A brighter image overall with fewer shadows or a darker vibe with brighter spots only where the light is pointed?
04:29Also, keep in mind that the distances matter a lot. My room, it's 11 by nine feet and the distance between me and the softbox, it's about five feet. As you see, the relationship
04:40HOOKbetween the lens you use and the light, it's huge. But even with the kit lens, the Godox m l 100 b, it's enough. And if you have two of them for better control,
04:51HOOKthat will be perfect. And of course, for a full cinematic look, you need to learn much more. But don't worry, I will offer you in a few minutes for free a full master class on how to position the lights and how to use a fill light, a hair light, or a background light.
05:07HOOKLet's move first to the second important factor, the softbox you use. This is tricky and important for that cinematic look. Creators who film in small rooms most of the time don't have enough space for big softboxes,
05:22but the difference between them is important. As you saw, this is how the image looks with a relatively large softbox 24 by 24. Now, I will switch to a smaller softbox, an 11.8
05:35by 11.8 inch softbox, while keeping all the settings the same.
05:39Let's analyze them side by side. As you can see, because the distance between the light source and the diffusing fabric is shorter, the shadows are more pronounced.
05:50Also, at the skin, the light is harsher. It's not a night and day difference, but it's there and it can be important. If you don't have space for a bigger one, this small softbox can work.
06:04But if you want that soft look with fewer shadows, a bigger softbox is important. For the m l 100 b, you can find this small softbox with amount that fits directly on the light and it costs around 39 US dollars at the time of recording this video. Also, if you want a bigger softbox, you can buy the balance mount adapter for $19
06:25and use any big softbox. This big one costs around $50. And, yes, it can hold a bigger softbox without problems.
06:33Now, let's see another huge factor to take into consideration, the space you have to position your lights. If you have some distance between you and your light and some space behind your desk as I do now, a light with the softbox is the perfect choice for cinematic looks because you can better control the light with a grid and point it exactly where you want to create dynamics.
06:57But if you have the desk against the wall, the softbox will clearly be too close to you or you won't even have space to place it. And even if you have the space, the softbox being so close will hurt your eyes while shooting and be a distraction. In this case, I recommend LED panels.
07:17Also, if you have a white wall in front of you, you can bounce them off the wall to get the softest light possible, but it's not very directional. For LED panels and the bouncing technique, I will add a link to a dedicated video in the description. Now let me show you why I chose this specific light after testing many others.
07:35First, the size was a primary factor for me. This is extremely compact. I can use it attached to a very pool super close to the wall to save space and avoid big light tripods.
07:46I can clamp it to the desk as I do with an LED panel and bounce it off the wall in front of me. This is the size difference compared to a classic video light. Next, the fans are quiet.
08:00Yes, if you had the light super close to you and it's at high power, you can hear the fans with big headphones. It also depends on which mic you use and how close you keep it to the mouth. And, of course, you can clean the noise in post production.
08:16I now use an omnidirectional lav mic, which picks up everything around me. This is the worst case scenario,
08:23and that noise, it's not a problem. Now here is a specific aspect that it's different from one case to another.
08:32If you use other Godox lights as I do, it's convenient because I can control them all from the same app. I can control my hair light, my LED panel, and the main light because they are all in the same ecosystem. This is an aspect to consider if you already have some lights.
08:50Think about whether you want to migrate to a complete ecosystem. This model is bicolor, so I can control the light temperature.
08:59This is something I like. The build quality is great, the controls are well optimized, and the mounting and positioning system is well built. And if you want a spotlight, the light also comes with this spot reflector.
09:12Another useful feature, you can power it in the studio with the included adapter that plugs into a wall socket or use a power bank or a v mount battery with the USB c port. The power you can set it at and the time it lasts vary from one power bank to another. For example, with this NPF battery from SmallRig, I can use the light at maximum brightness of 36%
09:37for one hour and forty four minutes. Now why do I say it checks almost all the boxes for Talking Head creators?
09:46If you have the desk against the wall, I still prefer LED panels because they come with stands that attached to the desk and are dead silent with no internal fans. And if you use a fast lens like the Sigma 60 millimeters f 1.4, the light is more than enough with two of these.
10:03But with the bouncing technique, everything is lit up and it's not that cinematic, but it's a matter of preferences.
10:11These e s 40 fives are similar to the Elgato key lights. Those are also great. In this particular situation,
10:19I prefer the LED panels. But in other situations, the m l 100 b plus softbox, it's ideal because you can control the light and achieve a more cinematic look. Some controlled shadows,
10:31half of the face a little darker, and the ability to position it more precisely. The light costs around 199 US dollars at the time of recording this video.
10:42And if you need the light stand, that's around $50. Of course, for all the equipment presented in this video and my full setup, I will add affiliate links in the description. If you click on my links, you're not going to pay anything extra, but I will earn a small commission This will help me keep sponsors away from this channel and create more valuable content for you.
10:59CTAThank you. In a small space using the keyed lens or a fast lens, the m l 100 b is a great choice. It meets the size requirements,
11:07CTAthe fan noise is low, the mounting system is great, you can power it even with a USB c and softboxes are available. Also, it is easy to control with the complete ecosystem,
11:19CTAbut you can choose the best light for nothing if you don't know how to position it right, how to use it, how to balance it with the entire scene, or set the exposure. And for this, I will give you a dedicated video, a full YouTube lighting master class that will help you set everything to achieve the dream look you are searching for.
11:39CTAWatch this video, combine the techniques with your light, and transform the look of your videos immediately.
— full transcript
§ 05 · For Joe

Steal the decision-tree format.

Structured gear review playbook

The most trustworthy gear reviews do not start with the answer — they start with the variables.

  • Open with a genuine question, not a verdict. Name the product early but let the evidence build to the conclusion.
  • Structure every gear review around 2-3 decision variables (lens, softbox size, room space) — turns a review into a framework viewers can apply themselves.
  • Use your camera LCD as live proof. No graphics needed — the viewer sees actual ISO and aperture values in real time.
  • Ship the split-screen comparison. Big vs Small Softbox side-by-side is a standalone shareable asset.
  • Name the caveat explicitly. Saying it checks almost all the boxes disarms negative comments and reads as honest rather than hedging.
  • Bridge to the next video with a technique gap: you can choose the best gear for nothing if you do not know how to use it — clean CTA with no hard sell.
§ 05 · For You

What actually makes video look cinematic.

For creators who want better-looking videos

Cinematic lighting is not about buying the most expensive light — it is about understanding three variables: your lens aperture, your softbox size, and how much space you have.

  • If you have a kit lens (f/3.5-5.6), you need more light or higher ISO. A fast lens (f/1.4-2.8) makes your existing light go much further.
  • The cinematic look is just a main light illuminating one side of your face more than the other, plus a softer fill on the darker side. That is the whole secret.
  • A bigger softbox produces softer shadows and more flattering skin. A 24x24 inch box is a reasonable minimum for a home studio.
  • ISO is not the enemy. ISO 640 on a modern mirrorless is clean. Do not crank the light to max just to keep ISO low — lower light at higher ISO often looks more cinematic.
  • If your desk is against the wall, skip the softbox and use flat LED panels — they attach to the desk, run silent, and bounce beautifully off a white wall.
  • The Godox ML100 Bi costs $199 and is genuinely compact. If space is the constraint, the Godox ES45 or Elgato Key Light are solid alternatives.
§ 06 · Frame Gallery

Visual moments.