Stephen G. Pope · Youtube · 23:29

n8n, OpenClaw & Make are DEAD (my NEW AI Agent buried them)

A 23-minute live demo of PopeBot — a self-hosted agent that writes its own skills, routes every code change through a GitHub PR, and runs 24/7 without node-wiring.

Posted
March 2nd 2026
2 months ago
Duration
23:29
Format
Tutorial
educational
Channel
SG
Stephen G. Pope
§ 01 · The Hook

The bait, then the rug-pull.

The claim lands in the first fifteen seconds: a self-hosted agent that writes its own integrations on demand, reviews its own code changes before they go live, and runs without a SaaS subscription. What follows is 23 minutes of live proof.

§ · Chapters

Where the time goes.

00:00 – 01:37

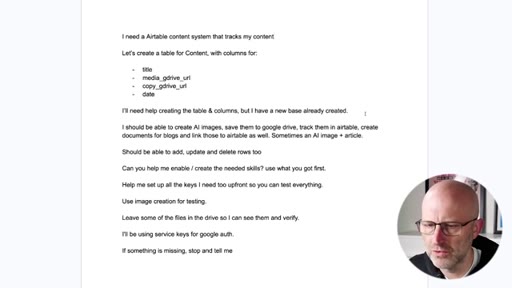
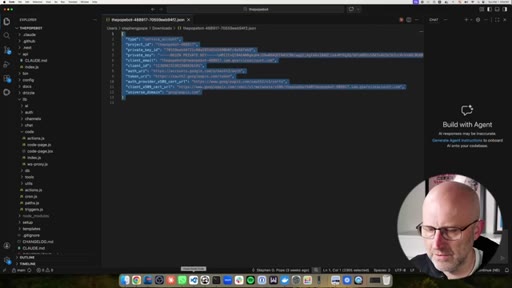
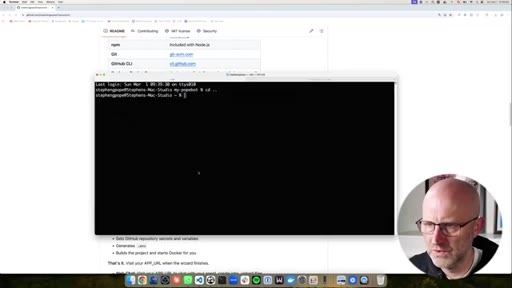
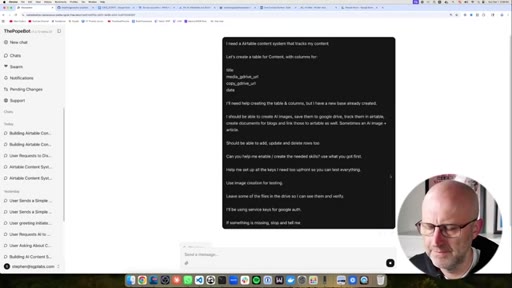
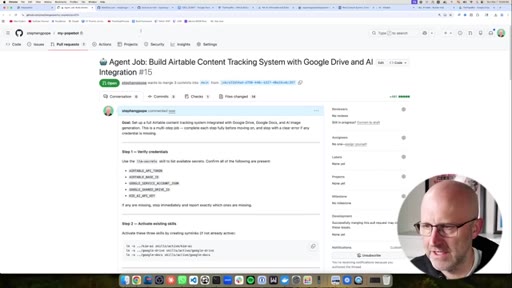
01 · Cold open + project prompt

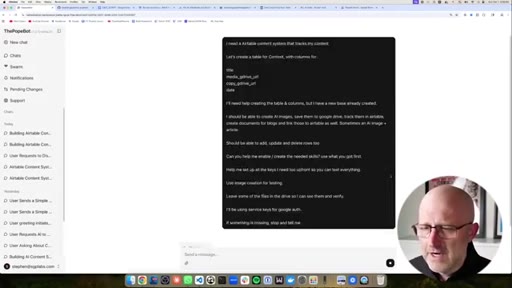
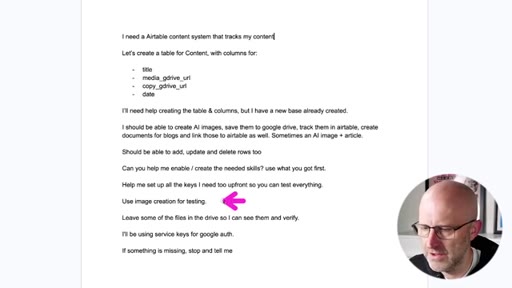
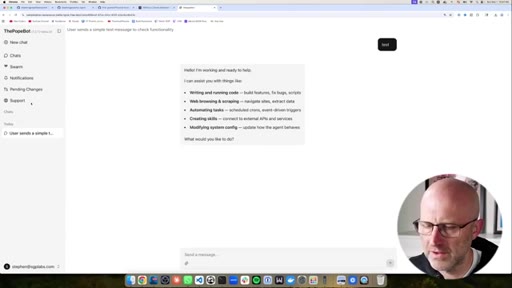
Displacement claim against n8n/Make/OpenClaw, then pasting a detailed Airtable content system prompt into the PopeBot chat interface.
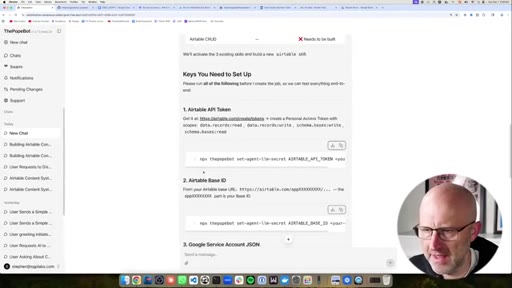
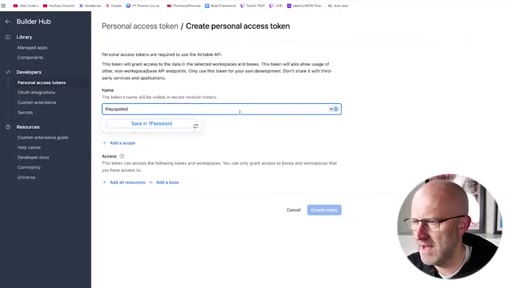
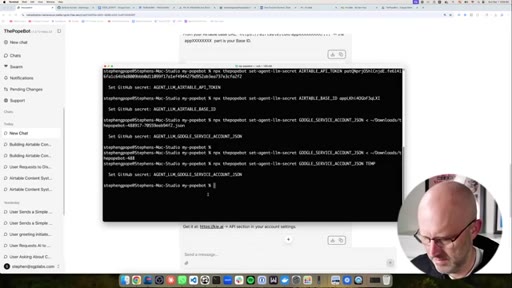
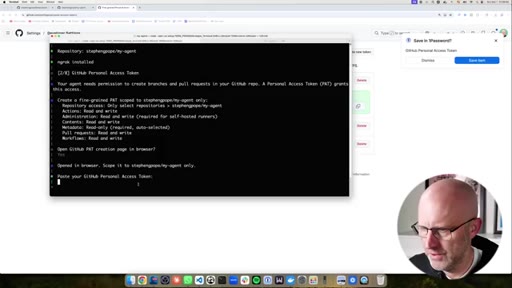
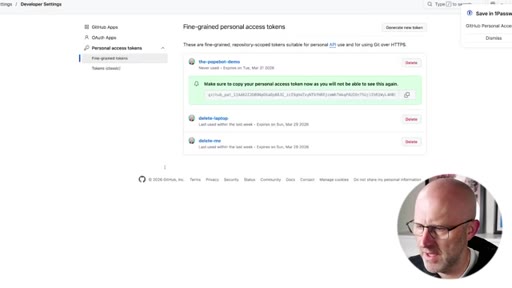
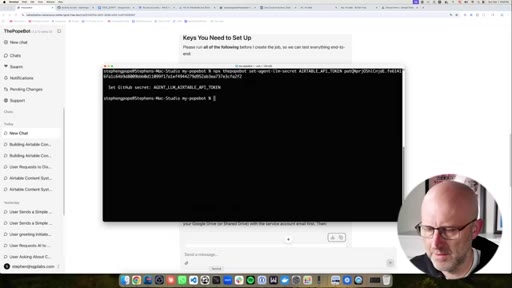
01:37 – 03:50

02 · API key setup

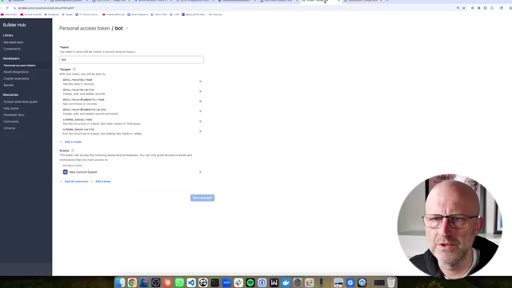
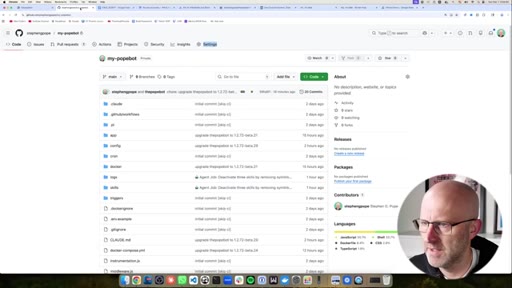
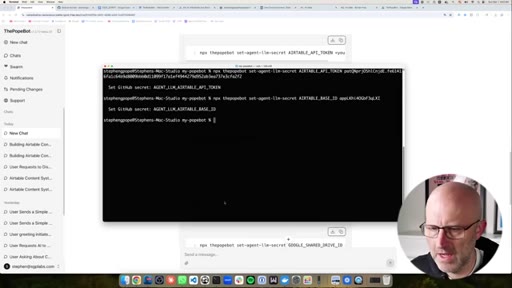
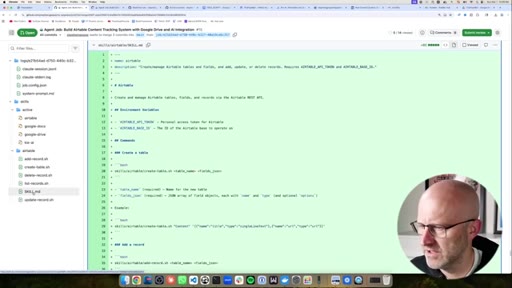
Setting Airtable API token and base ID as GitHub repository secrets via terminal commands the agent generates.

03:50 – 06:13

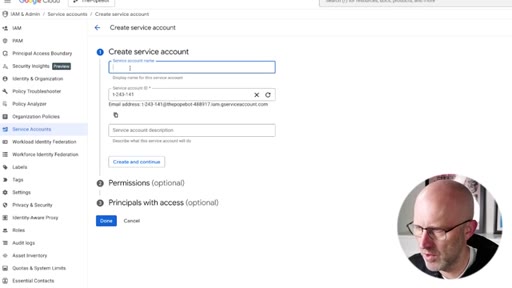
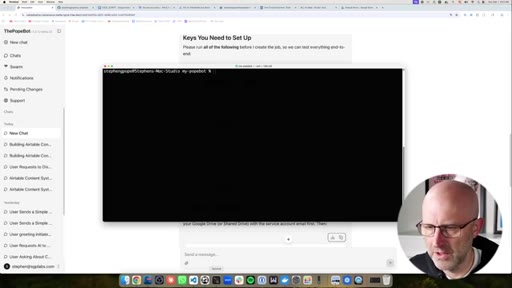
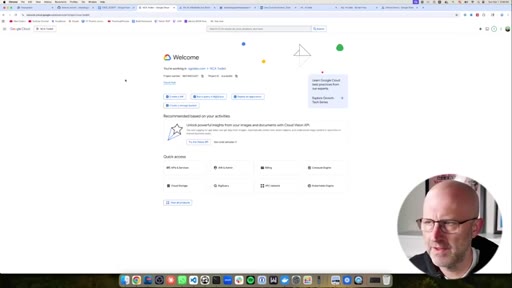
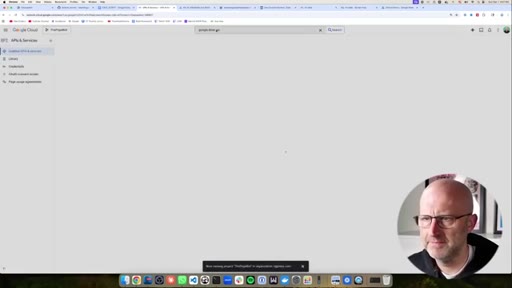
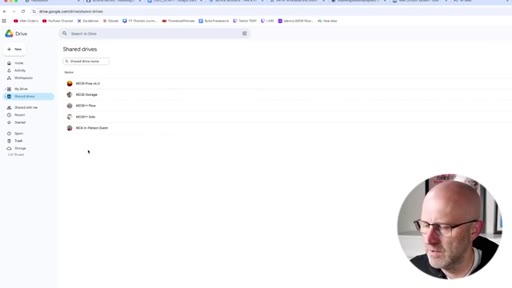
03 · Google auth setup

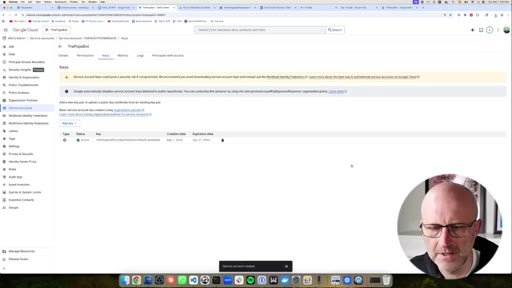
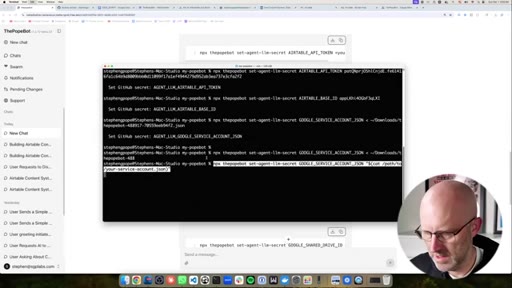
Creating a Google Cloud project, enabling Drive and Docs APIs, creating a service account, setting up a shared drive, and downloading the JSON key.

06:13 – 09:04

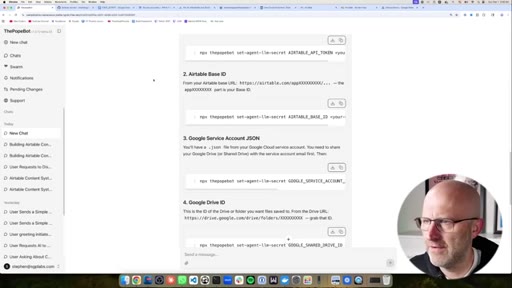
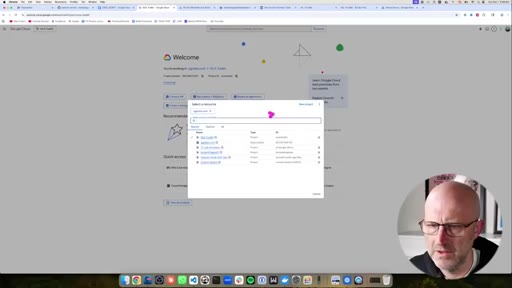
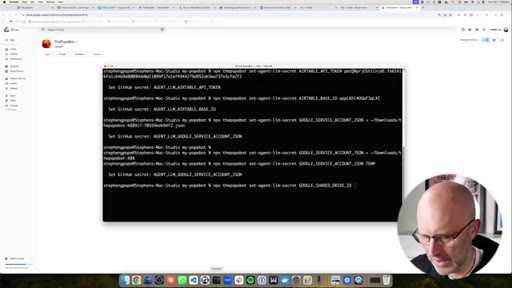
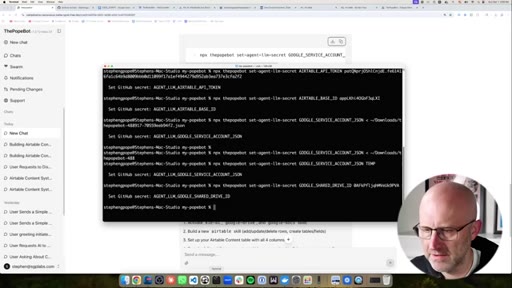
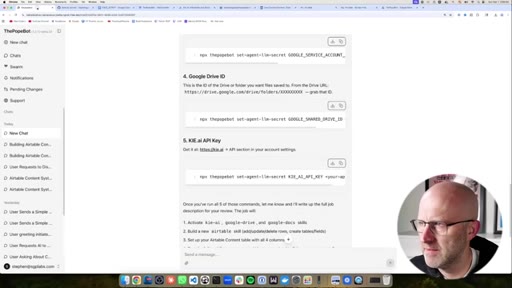
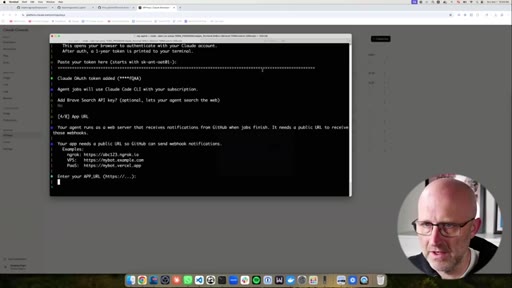
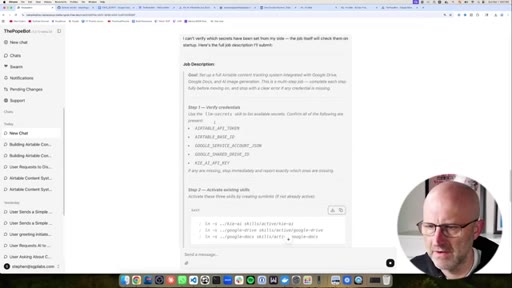
04 · Remaining secrets + plan review

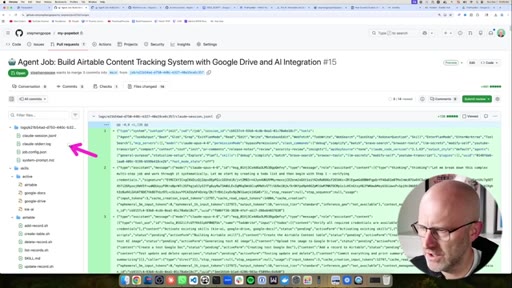
Google Drive ID and kie.ai image key; reviewing the agent's structured job plan before approving execution.

09:04 – 12:32

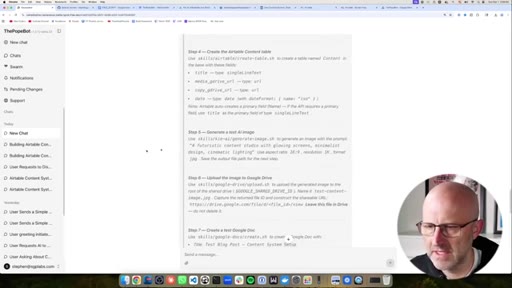
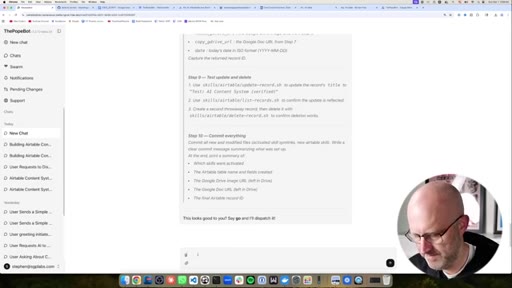
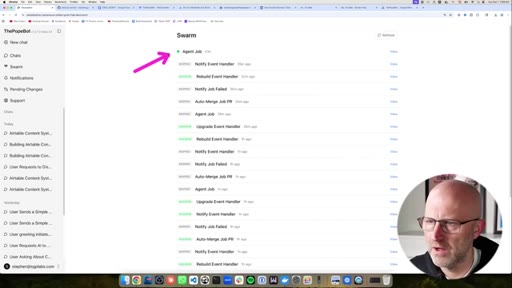
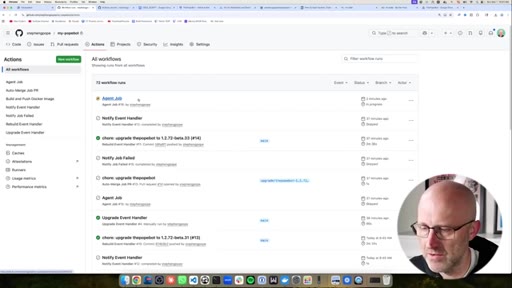
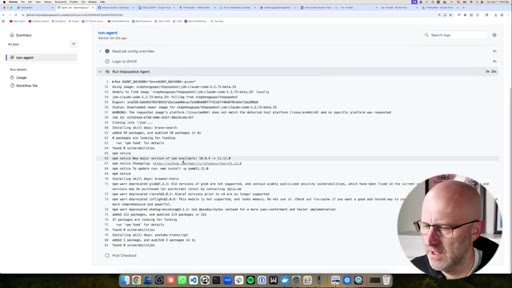
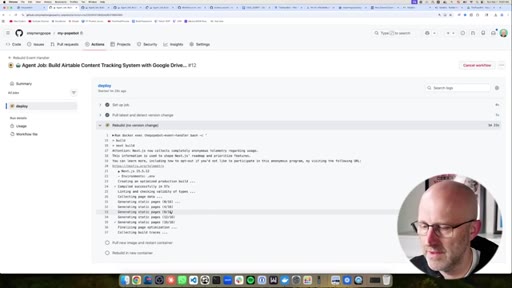
05 · Agent runs the job

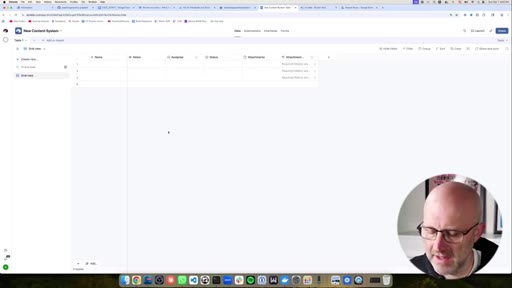
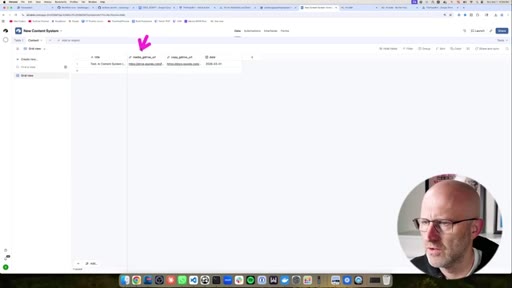
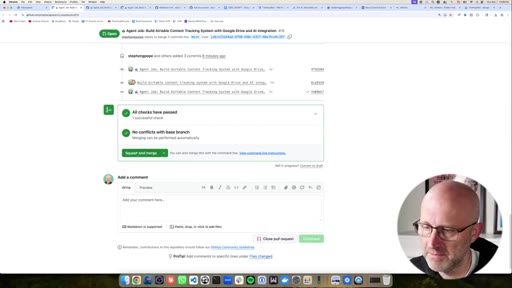
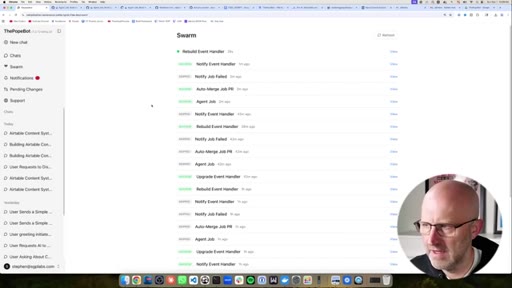
Watching the Swarm as GitHub Actions runs Claude Code; agent builds the Airtable skill, creates test records, generates an image, submits a PR.

12:32 – 15:42

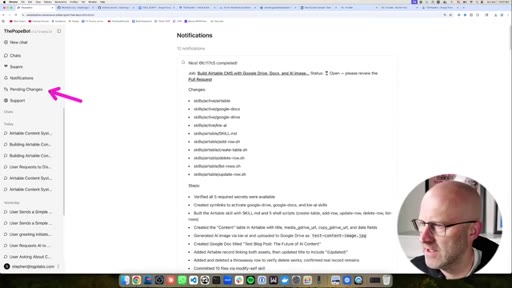
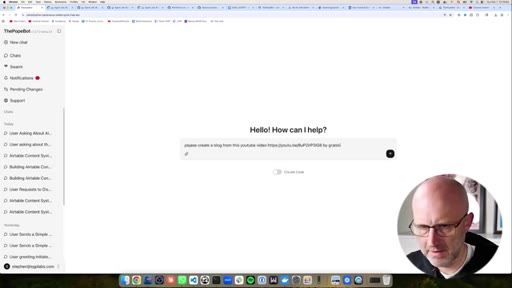
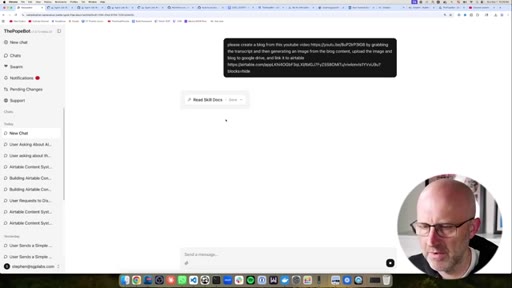
06 · Second demo: blog from YouTube transcript

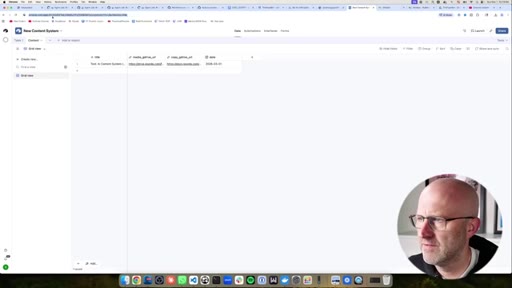
Using the newly activated skill set to generate a blog post and AI image from a YouTube video transcript, stored back to Airtable with no code changes required.

15:42 – 17:20

07 · No-approval workflow explained

Distinguishing code-changing jobs (PR required) from execution-only jobs (no approval needed) and how to configure each.

17:20 – 22:07

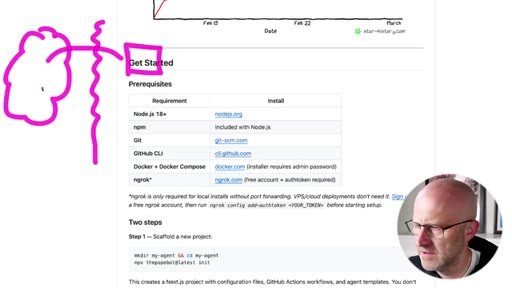
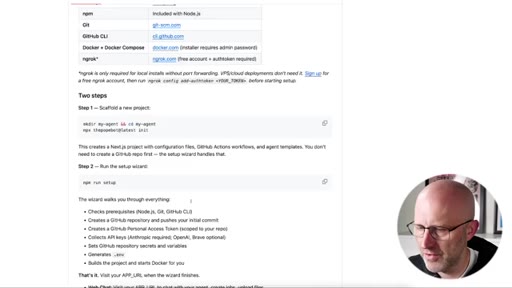
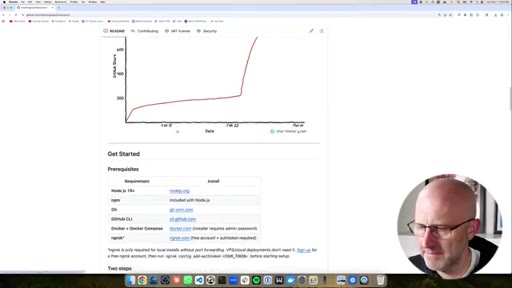
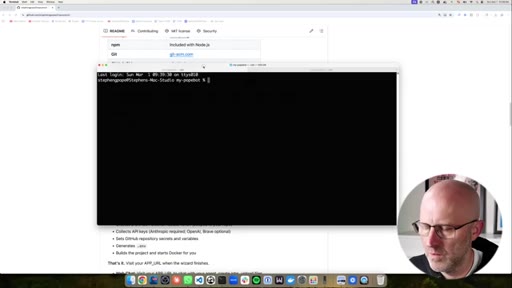
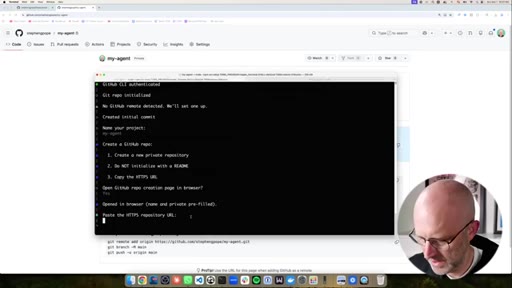
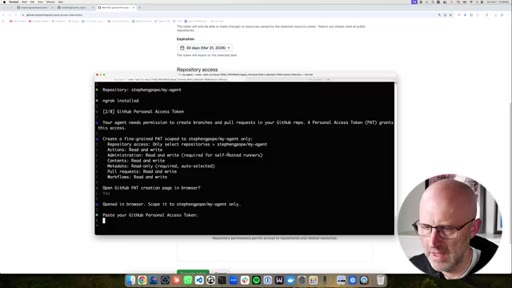
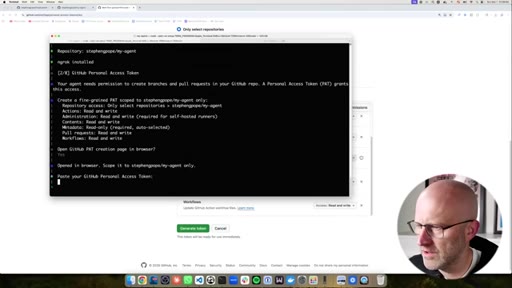
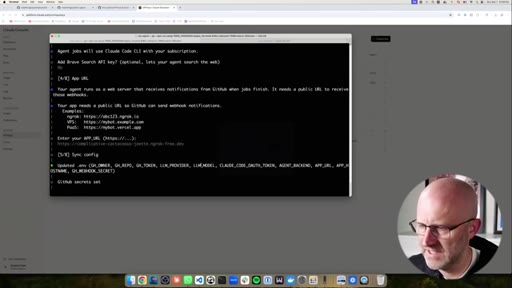
08 · Full install walkthrough

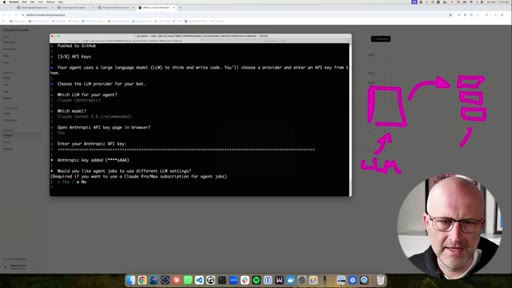
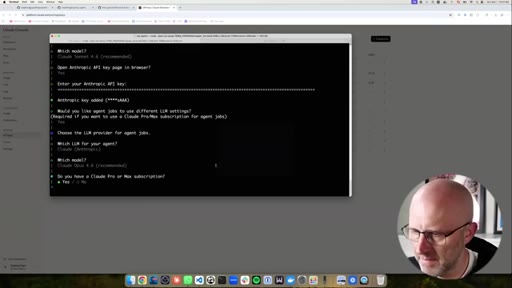
Clone repo, npm run setup wizard: GitHub PAT, LLM selection (Claude Sonnet for chat, Opus for jobs), ngrok URL, first login.

22:07 – 23:29

09 · Community CTA

Pitch for AI Architects community: 2026 course from beginner to AI product engineer, daily calls, working sessions.

§ · Storyboard

Visual structure at a glance.

hook
airtable setup
google auth
swarm running
skills list
install walkthrough
CTA
§ · Frameworks

Named ideas worth stealing.

00:00 model

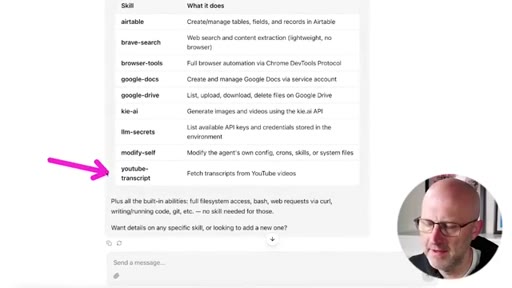
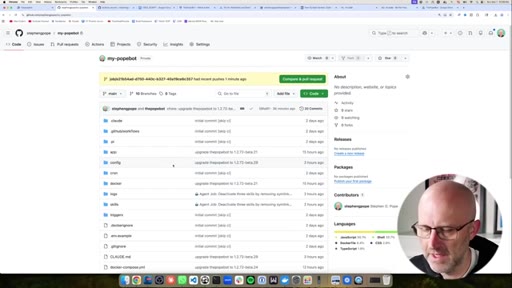
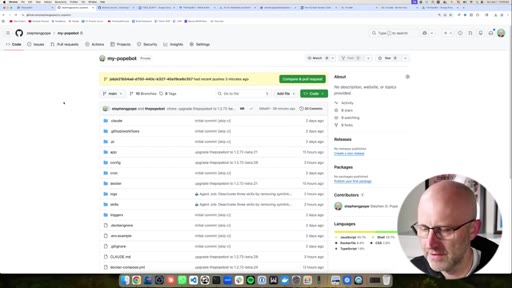
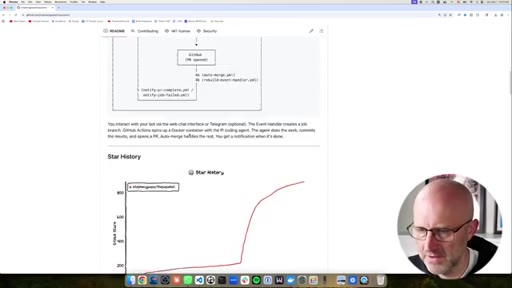
PopeBot skill architecture

Agent capabilities stored as discrete skill files in GitHub. When a task needs a missing skill, the agent writes it, commits as PR, owner approves. Built-in skills: modify-self, llm-secrets, browser-tools, youtube-transcript.

Steal for Any internal tooling project where you want an agent to extend itself without unlimited autonomy
10:30 model

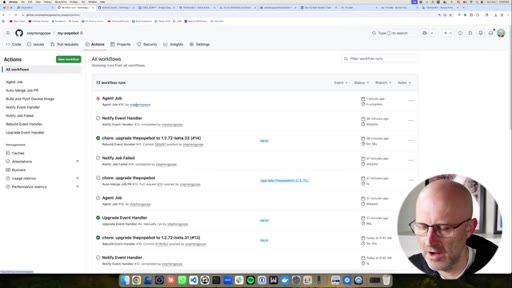
Approval gate pattern

Code-changing jobs (new skill, config change) go through PR review. Execution-only jobs (running existing skills on data) bypass approval. Owner controls which category each action falls into.

Steal for Any agentic workflow where you want auditability without friction on every run
§ · Quotables

Lines you could clip.

00:09
"Tools like OpenClaw are a security nightmare. It modifies itself with zero oversight."
Sharp competitive claim with no hedging — lands in under 10 seconds → TikTok hook
10:47
"I definitely recommend in the beginning you review everything that it's doing so that it doesn't do something that you didn't intend."
Nuanced safety caveat from someone selling autonomy — unexpected credibility moment → IG reel cold open
16:15
"You only need to approve when it's actually creating a new skill and changing its own code."
One-sentence explanation of a nuanced permission model → newsletter pull-quote
§ · Resources Mentioned

Things they pointed at.

§ · CTA Breakdown

How they asked for the click.

22:07 product
"If you need more than support and you want to actually learn how to build cool stuff like this, make sure to jump into the AI architects."

Placed after the install walkthrough is complete; secondary subscribe nudge was also placed mid-video at ~16:39 with an animated bell overlay.

§ 04 · The Script

Word for word.

HOOK opening / re-engagementCTA the pitch
00:00HOOKI built an AI agent that replaces n8n, make.com, and OpenClaw. You give it a project, it builds the skills it needs, then finishes the job. Tools like OpenClaw are a security nightmare.
00:09HOOKIt modifies itself with zero oversight, and n8n and make.com have you connecting nodes like it's 2,019. It took me weeks to architect a system that actually works and lets you review every change to the agent before it goes live. In this video, I'll give my agent a project to step back and we'll watch it build what it needs to finish the job by itself.
00:26HOOKAnd by the end of this video, you'll have your own self improving AI agent working for you twenty four seven. Let's get into it. We're gonna get started here in the PopeBot chat interface.
00:35HOOKThis is what you'll see right after you install the PopeBot. And as we go and I prompt the system, I'll be able to explain more about how it works. And I've got an insane new feature that I'm about to release, so make sure to check that out.
00:44HOOKAll right. So I have a prompt that I've already created just to get us going, and I'll link this in the description below. But basically, I'm asking the PopeBot to create me an Airtable content system with a few different columns.
00:55HOOKI'd like it to create the table and columns for me. I'm letting it know it should let us create AI images, and it should be able to save to Google Drive to track everything in Airtable and to create documents for blogs, and also linking those to Airtable. We should be able to add, update, and delete rows.
01:10HOOKAnd then I'm just asking it to enable and create all of the skills that we need. And it would already do this, but I'm asking it to help me set up all the keys and walk me through that process and to use image creation for a test and to leave some of the files in Google Drive during the test so I can see and verify them.
01:27HOOKAnd then if something goes wrong, to go ahead and stop and tell me instead of trying to figure everything out. So I'm just gonna go ahead and take this prompt. We'll come over here.
01:34HOOKWe'll drop it here into the chat. It's gonna go ahead and think through. It's gonna look and see what skills are available already.
01:42So I already have some skills that I've built into the system, but they are inactive and it just needs to be enabled. However, it doesn't have an Airtable skill, so it's gonna build that out for us. Alright.
01:51So you can always just scroll down and check out the plan. The first thing that's gonna walk us through is setting up some secrets so that these skills can actually do their job. We're gonna need some API tokens.
02:02And just keep in mind, I might do a few things here that seem a little technical, but I'm gonna explain them as I go. So just be patient and I'm also gonna do the install at the end. Basically, just need to set up these tokens here.
02:12So the first one we need is Airtable. So I'm gonna go ahead and copy this and I'm gonna jump down to the terminal. If you're on Windows, you should have something just like this.
02:20Don't be afraid of the terminal. I'm inside of my PopeBot directory, and I'm gonna show you that as well later. So I'm just gonna type or paste that in.
02:27I'm gonna remove that placeholder there. I'm gonna go to Airtable, and remember our prompt already said that I had created the Airtable base.
02:36So in Airtable, I had gone through the process of just creating the base. It's just an empty base. I haven't changed this at all.
02:42I just named it new content system. I could have had the bot do this as well, but then I would have had to give it a API key for the entire system, and I'd rather give it permissions just to this one particular base. So I'm gonna jump over to Airtable.
02:54I'm gonna come up here. I'm gonna go to my account. I'm gonna go to the developer hub.
02:58Gonna go over to personal access tokens. Create a new token. Call it the
03:04PopeBot demo. For scopes, I'm gonna go ahead and give it just about everything down the line. It might be handy to have.
03:11It needs to be able to read the base and update the base so it can create its own tables and columns. And I'm just gonna give it access to this particular base.
03:20New content system. That way the bot only can modify this one particular system and then I'm just gonna take this key and I jump back to the terminal, gonna drop that there and it's gonna add it.
03:31Now again, I'm gonna go over this in a little bit more detail, but the PopeBot does get its secrets inside of GitHub. This is where we store everything. If you don't know what GitHub is, don't worry.
03:41We'll show you that in just a bit. And now if you notice here, we have that token here with the API key. So we'll just keep going.
03:47Now we need the base ID. We're gonna copy this, come back to the terminal. We'll go to our content system here.
03:54The base ID is gonna be right there. Copy. Come back to the terminal.
04:01Drop that right there. Good to go. Again, with the secrets, you're gonna notice that one is here as well.
04:06Now we've got the base ID. And just make sure you go through this part carefully. If you miss something, it just slows you down.
04:12Now we're gonna set up the Google authentication. So now this one, just follow me here. This is gonna be easy, but I just wanna show you how to do it.
04:18And by the way, if you did ask the bot how to do this, it would walk you through the same steps. I'm gonna head over to Google. I'm gonna type
04:25Google Cloud and I'm gonna jump over into the Google Cloud here and we're gonna go to the console. Now I am using a Google Workspace account for this.
04:33I do that because it's able to keep things more secure by using shared drives. Already have a bunch of projects, but if you're new to Google Cloud, you'll need to create a project. New project,
04:44the Pope Bot. We'll go ahead and create that. It's gonna take just a second.
04:49We're gonna select that new project. We're gonna head up to the menu here. Let's try to make things a bit bigger for you.
04:54We're gonna come over here to APIs, enable services, Google
05:00Drive API. Just gonna add that. We'll enable it.
05:04Once that's enabled, we'll go and do Google Docs API.
05:09Gonna go ahead and enable that as well. Now that we have those two, that's all we need. We're gonna come back up to the menu.
05:16We're gonna come down to I am an admin, and we're gonna go to service accounts. This allows us to create an account that is separate from our own account so that we can separate my own personal documents and what I wanna keep private from the bot and what I want to share with the bot.
05:32Next, we're gonna come up to create service account. Now if you run into any security limits as you go, just cut and paste those into Cloud or ChatGPT and have it walk you through how to disable those security warnings. I'm gonna name the service account the POPbot.
05:47In terms of permissions and principles with access, you can just go ahead and say done. Now before I get the credentials, I'm gonna do one thing. I'm gonna jump over to Google Drive and I'm gonna come to shared drives.
05:56I'm actually already here, but make sure you go to shared drives. We're gonna create a isolated drive where the PopeBot can work, but it's not accessing all of my files. You can give it access to all of your files, but you can do it through the shared drive so that you have more control.
06:09So I'm gonna come up here, new shared drive, the Pope bot. Make sure you follow all these instructions. It'll save you a lot of time.
06:16Now we need to share it with this service account. Manage members. Simply share it.
06:23You're good to go. Now we're gonna go into the service account. And now we're gonna go ahead and generate keys.
06:30Add key. Create new key, JSON. This is where you might hit a security issue.
06:36Just go ahead and walk through any of those warnings, take screenshots, work it through with ChatGPT. You'll notice that it downloaded a security file here. We're gonna use that.
06:45That's what we need. I'm gonna jump back to the Pope bot and it gives us this command here. So I'm gonna go ahead and copy this.
06:53Now one thing about this, I'm just gonna show you a super easy way to deal with something. So the file we just downloaded, I'm gonna go ahead and open that up, is multiple lines and that doesn't really work great here on the command line.
07:07There is a way to deal with that. If I use a less than sign and I reference the file directly in my downloads, I can do it this way. So that will work.
07:16If you wanna do it that way, I'll go ahead and just set it. But another way you could do this if that looks too complicated is you could just simply copy this, paste it like that, and just erase what it has and just write temp.
07:29Okay. So it put temp into this variable. Then you could come back to the secrets, but we're gonna see that variable is here now, and we could just edit it here.
07:37And then I could go to the file, just grab it, drop it here, update secret, and we're good.
07:44So there's a few different ways of doing it and I'll cover more about this as we go and in the install directions. So just hang tight, watch me go through all this, and then you'll feel a lot more comfortable at the end of the video. So now we've set up the Google Drive secret.
07:55Now we need the Google Drive ID. So I'm gonna come up to our shared folder. There's our ID.
08:00I'll grab the Google Drive ID command, paste that. Again, I'll erase the placeholder,
08:13drop in the ID. Carefully do this guys or you'll just run into issues later.
08:18And once you do this once, your bot will be able to do all this stuff without you having to do this over and over again. You just need to do this when you're setting up new skills. Now I'm going to go ahead and set up key.ai.
08:27This is a AI image and video creation platform. If you're using something else, it's very easy to create a skill for that. I'm gonna go ahead and just copy this, take it back to the terminal,
08:38erase the placeholder, we'll jump over to a key. I'm in my API keys already. Just gonna copy one that I already created.
08:45You can create one here. Add that key and now let's go back to the POPot. Just double check everything.
08:51Airtable API key, Airtable base ID. We did this. Google Drive key.
08:57HOOKThat looks like everything. So coming back here, it's just saying after you've done those five commands, let me know, and it's gonna write up the full job. Go.
09:05HOOKI would recommend always just reviewing what it comes up with. Make sure it aligns
09:11HOOKwith whatever your prompt was. Make any corrections. So it's going to verify the credentials first, then it's going to activate the skills that it already has in the system when you install the PopeBot.
09:21HOOKIt's gonna build the new one that doesn't exist. And by the way, I'll add this back into the project when I'm done so you can have it. It's deciding what it needs to do for the skill.
09:29HOOKStep four, it's gonna actually build out the Airtable database. It's gonna create a test image. It's gonna upload it to Google Drive.
09:35HOOKIt's gonna create a test Google Doc. It's gonna add that record to Airtable. It's gonna test everything and then delete it.
09:40And then it's gonna commit everything back into the POPbot so that it can use those skills in the future. And I'll show you how that works. And then it just says, this looks good to you, go ahead and go.
09:50So let's go. So it's creating that job. Alright.
09:54It looks like it was able to create the job. While it's doing that, we have a couple of minutes to just start talking a little bit about how all of this works. You can always track all of the jobs over here in the swarm.
10:05We're gonna see that the job is running and we can also click through on this job to GitHub, which is where all of the code for your PopeBot will exist. And the reason why we do this is because all coding projects
10:18use Git or some version of Git, which is version control. It keeps track of all of your code. It keeps track of all of the changes.
10:25And that's especially important with a self improving bot because you want to be able to track what it changes, validate it, confirm it so that you know what your bot is actually doing. And so we use git to do all that. And then once the action is actually finished, once it has gone through everything, it's going to submit that all back to GitHub so that you can verify it.
10:45Now all of this is configurable. So if you want your bot to come up with new skills without any validation or any review, you can do that. That's all configurable.
10:55But I definitely recommend in the beginning, you review everything that it's doing so that it doesn't do something that you didn't intend. And one thing to note here in the system here is that when something finishes, you'll see it in notifications.
11:08I was doing a little bit of testing earlier, and it's gonna show you the changes it made, the steps it went through, what went well, what didn't go well. If there are pending code changes, it's gonna show you right here.
11:20You can click on that and it's gonna show you the pull request. Once it's done with this job, we're gonna see that same thing. If you wanna get support, you can go ahead and click that link here.
11:29And again, you have all of your other chats down here. So we'll be patient as this job runs. You can always click into it, see what's going on.
11:36I'm currently using a new feature where the job is being completed by Claude Code, and it's using my Claude Max subscription. Based off of the latest comments from Anthropic, as long as you're using your Max subscription with Cloud Code specifically, you should be good to go.
11:49What they don't want you doing is using your Cloud Max subscription in other products or directly with the API. So we'll come back to the swarm, see how we're doing. Looks like it just finished.
11:58So first, I'm just gonna jump over to the PopeBot. Cool. Looks like we've got a test image here and a test blog.
12:04Let's jump over to Airtable. Remember this content table didn't even exist. Now if I click on it, we've got the title, the Google Drive URL for the image, and the document URL, and the date.
12:15And it looks like we have a pending change as I mentioned. So if you come here, we're gonna see that we have the pending change. And this is the part you have to remember to do.
12:25So if you wanna approve things, you gotta approve it. Right? It's easy to do.
12:29So don't get overwhelmed by these different things. GitHub is not hard to use. I'm trying to make it as simple as possible.
12:35And if you run into issues, let me know so I can make it even easier and easier. But if I click on this pending change and then I come to files change, I can always see what it changed. And now let's take a look because this is pretty cool.
12:45We also have the Cloud Code session here. So I can see exactly what it did and how well it did, how many tokens it took, and all that stuff so that I could always improve things as I go. Here you can see it activated
12:58four skills and then here we can see that it created the Airtable skill and I always recommend people just kind of take a look at what it's doing. This is a skill. You can look over the skill and review what it did.
13:09But again, if we come here, it's as easy as this. You click on the pull request, you just scroll down, you can read the review here, what it did, and then all you do is come to the bottom and you just say squash and merge.
13:19Don't worry about those terms, but I will explain them in future videos. I wanna make sure people don't feel intimidated by some of these things. You don't have to know all of these different things in order for this to work.
13:29So now once you submit that, what's gonna happen is if you come back to your swarm, you're gonna see a rebuild event handler fire off. And that all that means is that the code has been updated. And so we actually have to update this interface, this chat interface that we're using right here.
13:43And it takes a few minutes and while that's happening, it's possible that if you do a refresh, you end up getting a four zero four error. That's just your site rebooting after it got the new files. And by the way, I have some other YouTube videos that I just published that go a little bit more into that side of things.
13:58This video is really more focused on creating a new skill. But again, if you want support, just click there and you'll be able to get it. And again, if you ever wanna see exactly what's going on, just click through.
14:07You can go inside, just watch what it's actually doing. It's actually rebuilding the site right now.
14:11That means in just a few seconds it's going to do the restart. I'll try to catch it while it's doing that so that you can see what that would look like so it doesn't catch you off guard. It looks like it finished.
14:21I might not have caught it. But now if I come back to the chat and I just ask, we can see that it has all these new skills.
14:29Alright. So now I wanna show you something cool. I thought ahead a bit and I have this YouTube transcript
14:34skill that you can use to download your own videos transcripts and make sure you're only using the API to download things that you own. But we can use this to download the transcript and create a blog and create an image and then upload that back to Airtable. So I'm gonna jump back to a new chat.
14:48I'm gonna quickly jump over to YouTube. I'm gonna grab my most recent video, one that you should definitely check out. Shows you a little more of the back end of this tool.
14:57Then I'm just gonna say, create a blog from this YouTube
15:04video by grabbing the transcript
15:09and then generating an image from the blog
15:14content, upload the image and blog to Google Drive and link it to Airtable.
15:23And just to make it extra verbose, I'm just gonna give it the link. And of course, you can set up your skills in such a way where you don't have to tell it as much, but then you have to give that skill a little bit more information. That skill that we've created was a little more generic, so we're just gonna give it as many details as possible.
15:37So then I can go ahead and just run this. It's gonna come up the plan.
15:42I can review it and tweak it. So it looks good. So we'll let it go.
15:46It's gonna create that job. It's gonna take a few minutes and again you can always check things out over here on the swarm. Agent is working.
15:53If you click through it's gonna take you back to GitHub of course. I wanna integrate all of this into the pop out as well so that you can see everything from here. When it's done in this case, we won't necessarily have to approve anything because it's not changing itself.
16:06CTAIt's not creating new skills. You only need to do that when it's actually creating a new skill and changing its own code. In this case, it's just generating some material
16:15CTAand putting it into Airtable. So there's no code changes here, so you don't need to approve anything. And again, in previous videos, I do show you how you can turn that approval off or selectively decide what it can change and what it cannot without approval.
16:27CTAMake sure you like and subscribe to this video. I've got this insane feature right here. I'm not gonna turn it on now.
16:33CTAYou're gonna have to wait till the next video, but it is gonna blow your mind. If you think this is cool, you ain't seen nothing yet. Make sure to like and subscribe.
16:40CTAAnd by the way, thank you so much guys for all the support thus far. It's been super fun working with you guys and creating all these videos. Can't wait to see in the next one.
16:48CTAAlright. Looks like it finished up here. Jump back over to Airtable.
16:51CTAAlright. We've got our new blog based off of the actual YouTube video. Here is the article.
16:58CTAIt created an MD file as agents do. Open it with Google Docs. So here's the entire
17:04CTAblog from my own YouTube video and then also the image. Nice.
17:10CTAAnd like I said, no pending changes because we didn't make any code changes. We just let the agent do something. Alright.
17:16CTASo now let me show you how to actually install this. The link is gonna be in the description below. Try not to let yourself get too intimidated by GitHub
17:24and all these instructions and all the possibilities because this system actually is able to do a lot.
17:30Okay? But I've set up the setup instructions to be as easy as possible, and I'm gonna try to make them easier and easier, so keep giving me your feedback. And if you run into what you think is a bug, you can always come up here in GitHub and add an issue there.
17:43I've been active there fixing things as they come up. Now there are a few programs that you need to have installed ahead of time. If you don't have these installed, go ahead and do that.
17:51If you're doing a local install, you're gonna need this program right here. Your internet has a firewall that does not allow the cloud, in this case GitHub, to connect to your local computer.
18:02When you install this, it gives an endpoint here that GitHub will be able to talk to and interact with so that it can work with your POPOP. Now if you deploy this in the cloud or you use this long term, there are other ways of doing that.
18:15You can just configure your home router to allow it through, but that takes a little bit more effort. So for just local testing, this is a great option and it's free. So now you're gonna need to open up your terminal whether you're on Mac or Windows.
18:26I'm gonna CD out of my existing pop up. You can just copy this right here, drop it just like that. Now you're gonna leave it just like this.
18:34I'm gonna change it just because I'm gonna be pulling down a beta version. Now you know how to pull the beta versions as I'm working on them, but I don't want you to change that. By the time you see this video, it will be up to date.
18:47Go ahead and run that. Gonna grab all the files and do the install, install the dependencies. So we're ready to go.
18:53We're just gonna follow the instructions. NPM run setup.
18:59You wanna go ahead and name your project. It's gonna default to the directory that you created. Feel free to take a moment and read the instructions as we go.
19:05If you don't understand anything, jump into chat GPT or cloud and ask it what it's doing. We're gonna open up a git Hub repo creation page. This is gonna create the repository for your bot.
19:15You wanna leave all these settings as is, especially private. Create the repository. The next step is gonna ask for this, so I'm gonna grab it now.
19:21I'm gonna copy. Gonna drop in the URL here. Then we need to get a token from GitHub with all of these permissions.
19:29You can go ahead and allow it to just open up the page for you. The POP Bot demo.
19:35I'm gonna go ahead and select only specific repositories, my agent.
19:40And now you'll need to just have this open so you can see because we have to add these all here. Actions, workflows,
19:51pull requests, content,
19:56administration. And these all need to be read write. That's why I only gave a permission to this particular repository
20:07just for safety. We also need metadata, but that's always there. So 12345.
20:1312345. We're good to go. Generate the token.
20:18Grab that. Drop it here. Now we need to configure which LLM we're using for the Popebot.
20:25You can use Claude or GPT or Gemini. You can even use local models. I'm gonna go ahead and use Claude.
20:32I'm gonna use Sonnet 4.6 for the chat. We're gonna open up the Anthropic API page, create a new key, the poke button add.
20:41I'm gonna copy that key.
20:44Now it's gonna ask you this question here which is, do you wanna use a different LLM for the jobs? So if you think about the way this system works is you had the chat. We were working in the chat, But the chat launches these jobs.
20:56And we have an LLM that's helping us plan, but we can set a different LLM for the jobs. And in this case, what I'm gonna do is I'm gonna use my Claude Max subscription.
21:06So I'm gonna say yes. I wanna use a different LLM for the jobs.
21:11I'm gonna use Claude. I'm gonna use Opus 4.6. And I do have a
21:17Max subscription, so I'm gonna say yes. And then you can just drop your token there. Just gonna paste that right in here.
21:22Then it's gonna ask you if you wanna go ahead and enable Brave Search. They used to have a free plan. So this is a paid service.
21:30But what it allows your agent to do is search the web. Just makes your agent more powerful. You don't have to have it right now.
21:36So you can go ahead and say no. I'll say no just for the install. Now here's where we have to put in our URL
21:42for our bot. And so now here's where we're gonna use that ngrok command. I've already set up ngrok, so you're gonna wanna set up your free account and get that going.
21:51And once you have installed that and you're ready to go, open up your terminal, you just come here and you type NgrokHTTP 80. And remember, this is just a temporary solution.
22:01CTAYou don't have to do it this way long term. But to get up and running quickly, you're gonna grab that URL, gonna come back, you're gonna drop that here. It's gonna set everything up for you, set up the secrets, all your variables, it's gonna build the system.
22:13CTAIt buzzed right by but if you come back up here, gonna see that it actually should launch your server and you just and you can access it just by using this URL. Now keep in mind, it might take a few seconds for it to load the first time.
22:28CTAWhen it first boots up, you're gonna create your admin account. Of course, you're gonna give it a secure password. You're gonna create that account, then you'll log in,
22:36CTAand there you're ready to roll. Your system's totally built out, ready for your first message. And now if you run into any issues, just make sure you click that link for support.
22:45CTAAnd if you need more than support and you wanna actually learn how to build cool stuff like this, make sure to jump into the AI architects. Right now, I'm building out a brand new for 2026, an entire new course that takes you from beginner
22:57CTAto an advanced AI product engineer. Even if you're an absolute beginner, I'm gonna help you in a way that doesn't overwhelm you step by step all the way to building cool stuff like this. Plus we've got calls every single day and I personally answer all of your questions on Tuesday and Wednesday.
23:12CTAI also drop all of the newest releases here first before everyone else. And I also do these working sessions in addition to the calls you just saw where I go in-depth on how to do more complex things on all sorts of different subjects. I hope to see you inside the community.
23:25CTAEither way, hope you enjoyed this video and I'll see you on the next one.
— full transcript
§ 05 · For Joe

Why every self-building agent needs a review gate

WHAT TO LEARN

Autonomy without a checkpoint is a liability — routing every code change through a pull request is the minimum viable audit trail for any agent that can modify itself.

  • An agent that writes its own skill files compounds in capability over time, but each new file is also a new attack surface; pull requests make every change auditable before it executes.
  • Storing API credentials as GitHub repository secrets rather than local config files lets an agent run in any environment without risking files being accidentally committed or leaked.
  • The meaningful permission boundary is between code-changing jobs (require approval) and execution-only jobs (no approval needed) — tuning this ratio controls how much friction you trade for autonomy.
  • Scoping third-party API tokens to a single resource — one Airtable base, one shared Google Drive — limits blast radius to that resource if the agent misreads its instructions.
  • Running long agentic coding sessions under a flat-rate subscription rather than a per-token API eliminates cost unpredictability on multi-step jobs, but the platform terms matter.
  • An agent that surfaces a structured plan for human review before executing wastes less compute on jobs that were misunderstood from the prompt.
  • Self-hosted infrastructure on GitHub Actions means compute costs drop to zero when the agent is idle — the only ongoing cost is the public URL endpoint.
§ 06 · Frame Gallery

Visual moments.